
Docker 仓库,类似于yum仓库,是用来保存镜像的仓库。为了方便的管理和使用docker镜像,可以将镜像集中保存至Docker仓库中,将制作好的镜像push到仓库集中保存,在需要镜像时,从仓库中pull镜像即可。
Dokcer仓库分为公有云仓库和私有云仓库
公有云仓库:由互联网公司对外公开的仓库
- 官方仓库
- 阿里云等第三方仓库
私有云仓库:组织内部搭建的仓库,一般为组织内部使用,常使用下面软件搭建仓库
- docker registory:docker 官方提供
- docker harbor:VMware提供
10.1 官方docker仓库
将自制的镜像上传至docker仓库:https://hub.docker.com/
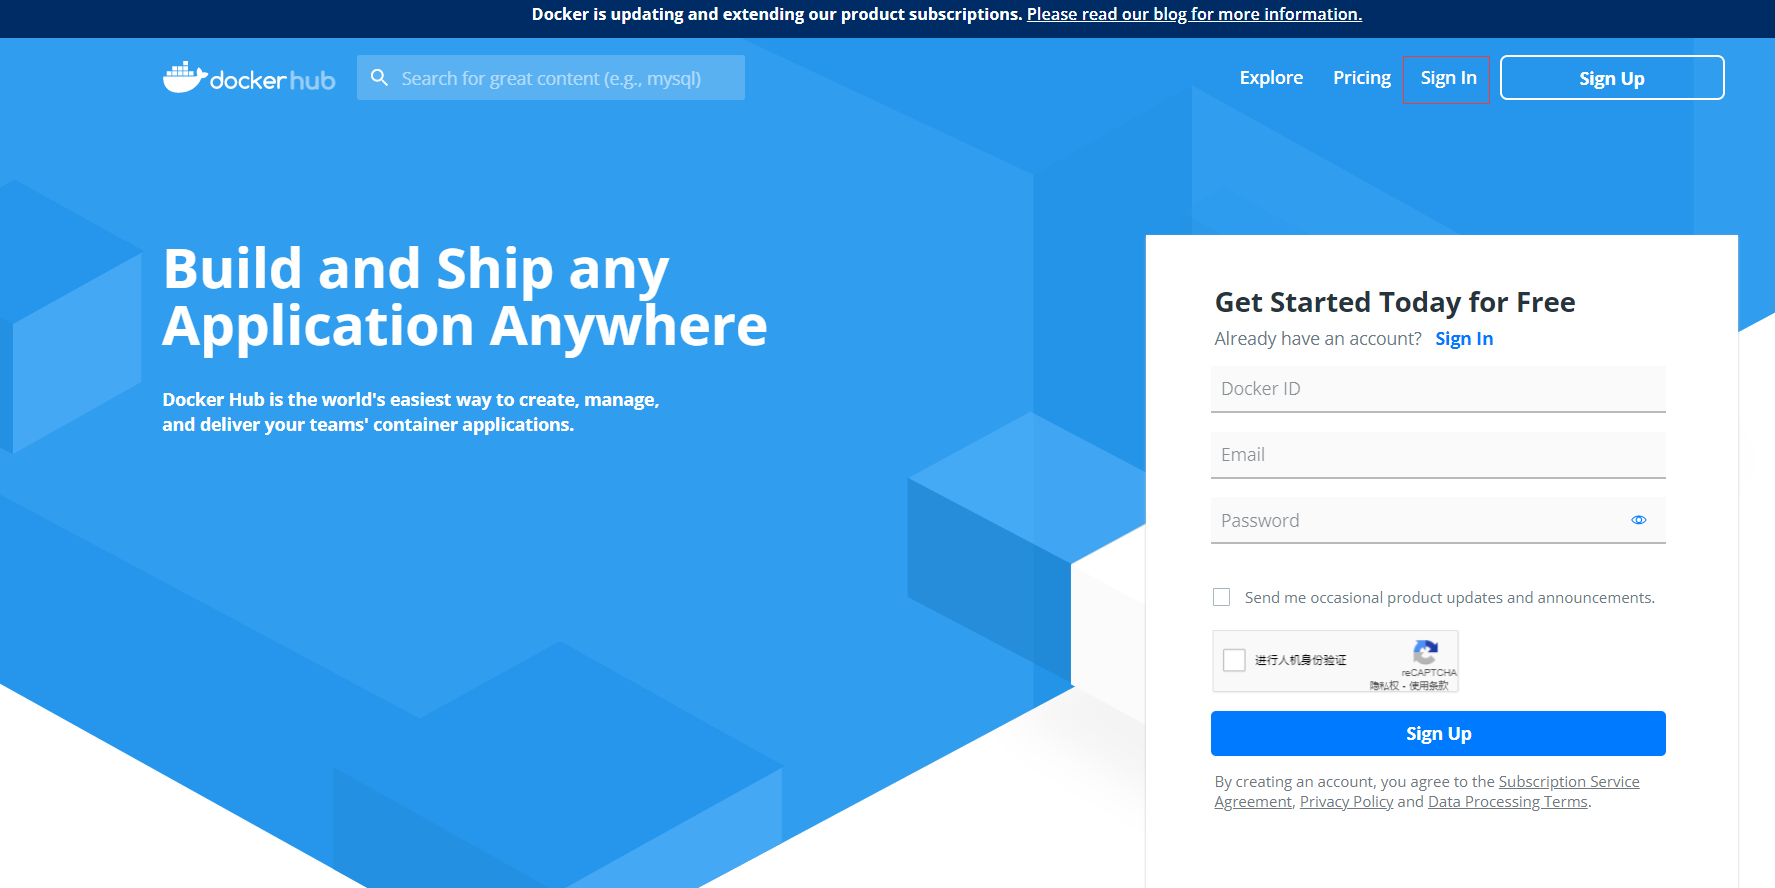
10.1.1 注册账户
访问hub.docker.com注册账户,并登陆

10.1.2 使用用户仓库管理镜像
每个注册用户都可以上传和管理自己的镜像
10.1.2.1 用户登陆
上传镜像前需要执行docker login命令登陆,登陆后生成:~/.docker/confing.json文件保存验证信息
格式:
Usage:  docker login [OPTIONS] [SERVER]

Log in to a Docker registry.
If no server is specified, the default is defined by the daemon.

Options:
  -p, --password string   Password
      --password-stdin    Take the password from stdin
  -u, --username string   Username
[root@centos8-1 ~]# docker login -uxxxxx -pxxxxx
WARNING! Using --password via the CLI is insecure. Use --password-stdin.
WARNING! Your password will be stored unencrypted in /root/.docker/config.json.
Configure a credential helper to remove this warning. See
https://docs.docker.com/engine/reference/commandline/login/#credentials-store
Login Succeeded
[root@centos8-1 ~]# cat .docker/config.json
{
"auths": {
"https://index.docker.io/v1/": {
"auth": "aGFvNjY1ODE6aEFPNjY1ODE/"
}
}10.1.2.2 给镜像打标签并上传
上传本地镜像前必须给上传的镜像用docker tag打标签
标签格式:docker.io/用户账号/镜像名:tag
[root@centos8-1 ~]# docker tag alpine:latest docker.io/hao66581/alpine:v3.14
[root@centos8-1 ~]# docker push docker.io/hao66581/alpine:v3.14
10.1.2.3 在官网验证上传的镜像
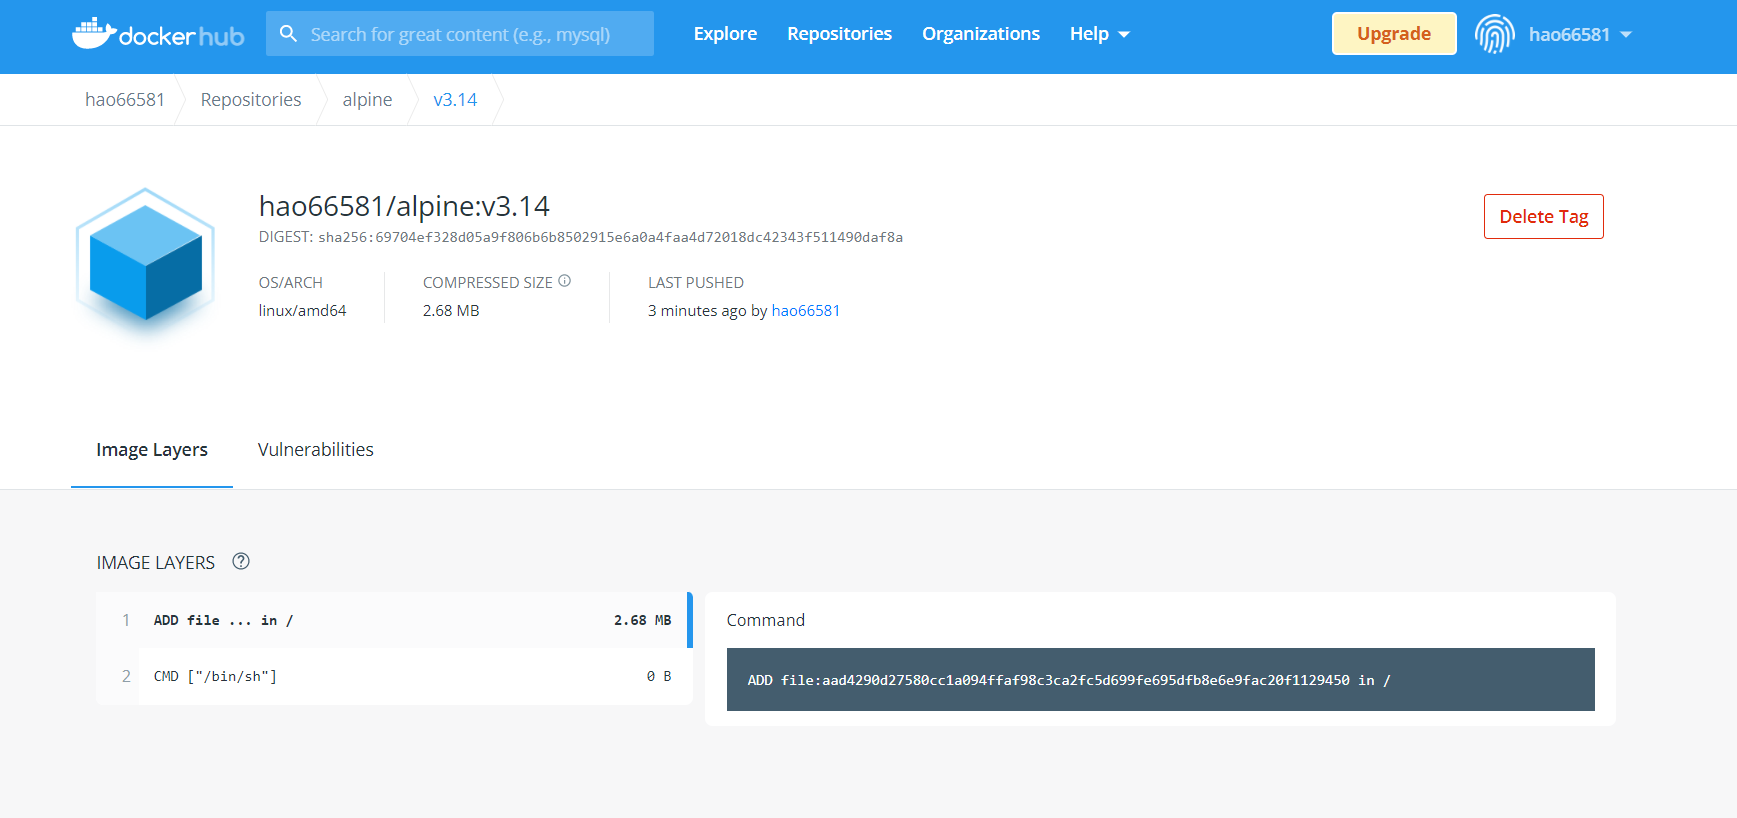
10.1.2.4 下载上传的镜像并创建容器
在另一台主机上下载镜像
root@ubuntu-18:~# docker pull docker.io/hao66581/alpine:v3.14
v3.14: Pulling from hao66581/alpine
Digest: sha256:69704ef328d05a9f806b6b8502915e6a0a4faa4d72018dc42343f511490daf8a
Status: Downloaded newer image for hao66581/alpine:v3.14
docker.io/hao66581/alpine:v3.14

root@ubuntu-18:~# docker images
hao66581/alpine     v3.14               14119a10abf4        3 weeks ago         5.6MB
10.2 Docker分布式仓库之Harbor
10.2.1 Harbor 介绍和架构
10.2.1.1 Harbor 介绍

Harbor是一个用于存储和分发docker镜像的企业级registry服务器,由VMware开源,其通过添加一些企业必须的功能特性,例如安全、标识和管理等,扩展了开源Docker Distrbution。作为一个企业级私有Registry服务器,Harbor提供了更好的性能和安全。提升用户使用Registry构建和运行环境传输镜像的效率。Harbor支持安装在多个Registry节点的镜像资源复制,镜像全部保存在私有Registry中,确保数据和知识产权在公司内部网络中管控,另外,Harbor也提供了高级的安全特性,诸如用户管理,访问控制和活动审计等。
harbor 官方github地址:https://github.com/vmware/harbor
harbor 官方地址:https://goharbor.io/
harbor 官方文档:https://goharbor.io/docs/
github文档:https://github.com/goharbor/harbor/tree/master/docs
10.2.1.2 Harbor功能官方介绍
- 基于角色的访问控制:用户与Docker镜像仓库通过”项目”进行组织管理,一个用户可以对多个镜像仓库在同一命名空间(project)里有不同权限
- 镜像复制:镜像可在多个Registry实例中复制(同步)。尤其适合于负载均衡,高可用,混合云和多云的场景
- 图形化用户界面:用户可以通过浏览器来浏览,检索当前Docker镜像仓库,管理项目和命名空间
- AD/LDAP支持:Harbor可以集成企业内部已有的AD/LDAP,用于鉴权认证管理
- 审计管理:所有针对镜像仓库的操作都可以被记录追溯,用户审计管理
- 国际化:已拥有英文、中文、德文、日文和俄文的本地化版本。更多的语言将会添加进来
- RESTful API:提供给管理员对于Harbor更多的操控,使得与其他管理软件集成变得更容易
- 部署简单:提供在线和离线两种安装工具,也可以安装到vShpere平台(OVA方式)虚拟设备
10.2.1.3 Harbor组成
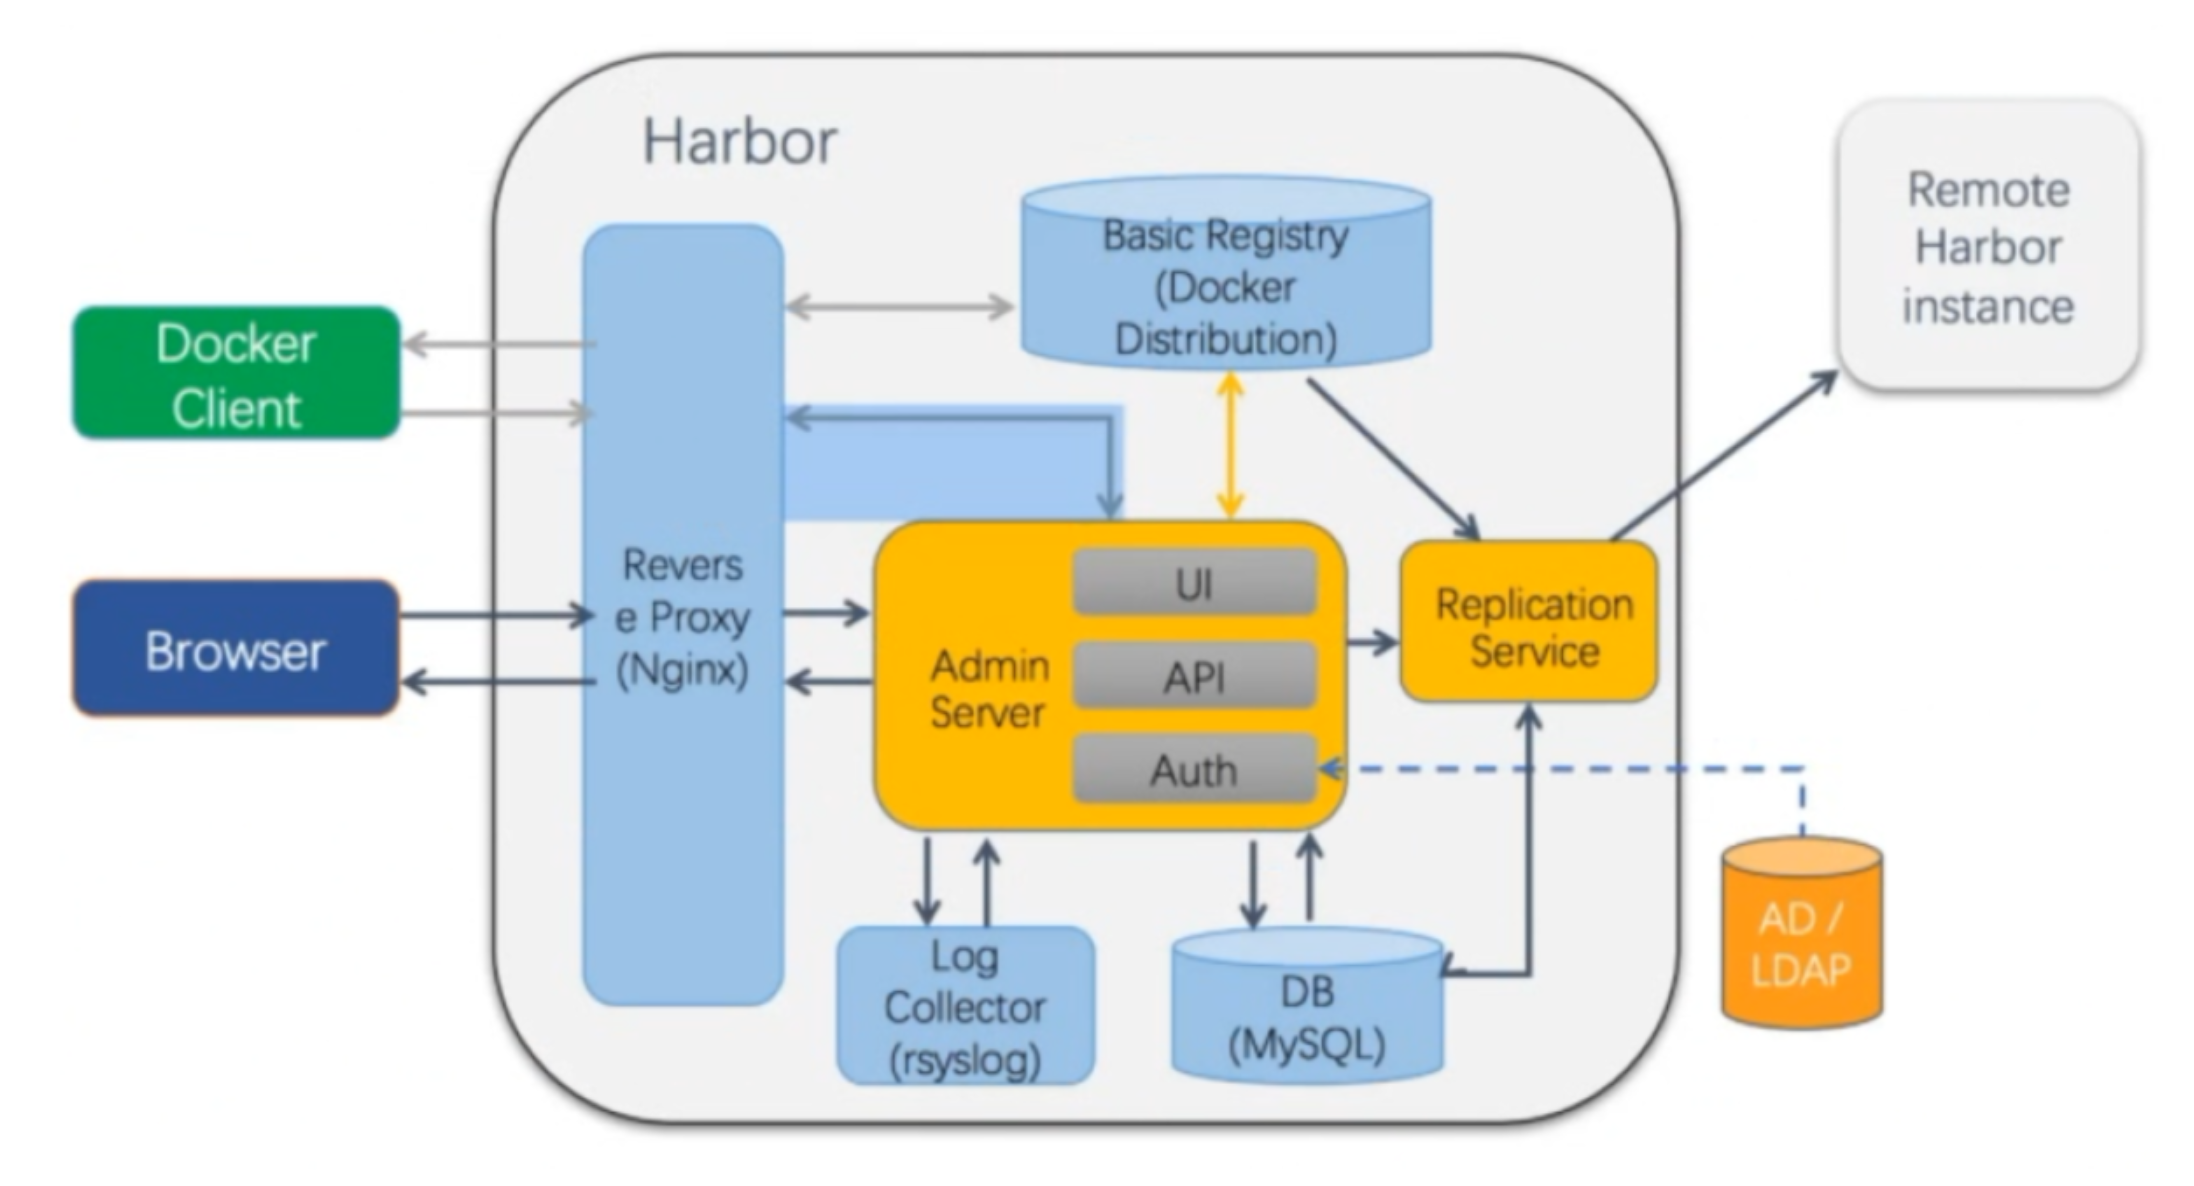
- Proxy:对应启动组件nginx。它是一个nginx反向代理,代理Notary client (镜像认证)、Docker client(镜像上传下载等)和浏览器的访问请求(Core Service)给后端的各服务
- UI(Core Service):对应启动组件harbor-ui。底层数据存储使用mysql数据库,主要提供了四个子功能:
- UI:一个web管理页面ui
- API:Harbor暴露的API服务
- Auth:用户认证服务,decode后的tocken中的用户信息在这里进行认证;auth后端可以接db、ldap、uaa三种认证实现
- Token服务(上图中未体现):负责根据用户在每个project中的role来为每一个docker push/pull命令发布一个token,如果从docker client发送给registry的请求没有带token,registry会重定向请求到token服务创建token
- Registry:对应启动组件registry。负责存储镜像文件,和处理镜像的pull/push命令。Harbor对镜像进行强制的控制访问,Registry会将客户端的每个pull、push请求转发到token服务来获取有效的token
- Admin Service:对应启动组件harbor-adminserver。是系统的配置管理中心附带检查存储用量,ui和jobserver启动时候需要加载adminserver的配置
- Job Service:对应启动组件harbor-jobservice。负责镜像复制工作的,他和registry通信,从一个registry pull镜像然后push到另一个registry,并记录job_log
- Log Collctor:对应启动组件harbor-log。日志汇总组件,通过docker的log-driver把日志汇总到一起
- DB:对应组件harbor-db,负责存储project、user、role、relication、image_scan、access等的metadata数据
10.2.2 安装Harbor
下载地址:https://github.com/vmware/harbor/releases
安装文档:https://goharbor.io/docs/
环境准备:共四台主机
- 两台主机当harbor,示例地址:10.0.0.110 | 120
- 另外两台主机上传和下载
10.2.2.1 安装docker
安装脚本:http://www.zhouqihao.top/?p=1471
10.2.2.2 安装docker compose
必须先安装docker compose再安装harbor,否则会报以下错
root@ubuntu-18:~/harbor# ./install.sh

[Step 0]: checking if docker is installed ...
? Need to install docker(17.06.0+) first and run this script again.
安装docker compose
参考链接:http://www.zhouqihao.top/?p=1549
10.2.2.3 下载Harbor安装包并解压缩
以下使用harbor版本2.3.2安装包
方法1:下载离线完整安装包,推荐使用
root@ubuntu-18:~/harbor# wget https://github.com.cnpmjs.org/goharbor/harbor/releases/download/v2.3.2/harbor-offline-installer-v2.3.2.tgz方法2:下载在线安装包,比较慢,不推荐
root@ubuntu-18:~/harbor# wget https://github.com.cnpmjs.org/goharbor/harbor/releases/download/v2.3.2/harbor-online-installer-v2.3.2.tgz解压离线包
root@ubuntu-18:~# mkdir /apps
root@ubuntu-18:~# tar xf harbor-offline-installer-v2.3.2_2.tgz -C /apps
10.2.2.4 编辑配置文件harbor.yml
参考文档:https://goharbor.io/docs/2.3.0/install-config/configure-yml-file/
root@ubuntu-18:~# cd /apps/harbor
root@ubuntu-18:~/apps/harbor# cp harbor.yml.tmpl harbor.yml
root@ubuntu-18:~/apps/harbor# vim harbor.yml
hostname: 10.0.0.110    #指向当前主机IP,或可解析的FQDN
http:
  port: 80                   #使用http,注释掉下面https的内容,同时开启或只开启https需要指定证书路径

https:
  port: 443
  certificate: /your/certificate/path         #https时,需要指定下面证书文件路径
  private_key: /your/private/key/path         #https时,需要指定下面私钥文件路径

harbor_admin_password: Harbor12345            #harbor登陆用户admin的密码,默认用户/密码:admin/Harbor12345

data: /data                                   #指定harbor组件容器挂载到宿主机的目录
10.2.2.5 运行harbor安装脚本
#先安装python
root@ubuntu-18:~/apps/harbor# apt -y install python
#执行脚本安装docker harbor
root@ubuntu-18:~/apps/harbor# ./install.sh
[Step 0]: checking if docker is installed ...

Note: docker version: 20.10.8

[Step 1]: checking docker-compose is installed ...

Note: docker-compose version: 1.29.2

[Step 2]: loading Harbor images ...
Loaded image: goharbor/redis-photon:v2.3.2
Loaded image: goharbor/nginx-photon:v2.3.2
Loaded image: goharbor/harbor-portal:v2.3.2
Loaded image: goharbor/trivy-adapter-photon:v2.3.2
Loaded image: goharbor/chartmuseum-photon:v2.3.2
Loaded image: goharbor/notary-signer-photon:v2.3.2
Loaded image: goharbor/harbor-core:v2.3.2
Loaded image: goharbor/harbor-log:v2.3.2
Loaded image: goharbor/harbor-registryctl:v2.3.2
Loaded image: goharbor/harbor-exporter:v2.3.2
Loaded image: goharbor/notary-server-photon:v2.3.2
Loaded image: goharbor/prepare:v2.3.2
Loaded image: goharbor/harbor-db:v2.3.2
Loaded image: goharbor/harbor-jobservice:v2.3.2
Loaded image: goharbor/registry-photon:v2.3.2


[Step 3]: preparing environment ...

[Step 4]: preparing harbor configs ...
prepare base dir is set to /root/harbor
WARNING:root:WARNING: HTTP protocol is insecure. Harbor will deprecate http protocol in the future. Please make sure to upgrade to https
Generated configuration file: /config/portal/nginx.conf
Generated configuration file: /config/log/logrotate.conf
Generated configuration file: /config/log/rsyslog_docker.conf
Generated configuration file: /config/nginx/nginx.conf
Generated configuration file: /config/core/env
Generated configuration file: /config/core/app.conf
Generated configuration file: /config/registry/config.yml
Generated configuration file: /config/registryctl/env
Generated configuration file: /config/registryctl/config.yml
Generated configuration file: /config/db/env
Generated configuration file: /config/jobservice/env
Generated configuration file: /config/jobservice/config.yml
Generated and saved secret to file: /data/secret/keys/secretkey
Successfully called func: create_root_cert
Generated configuration file: /compose_location/docker-compose.yml
Clean up the input dir


[Step 5]: starting Harbor ...
Creating network "harbor_harbor" with the default driver
Creating harbor-log ... done
Creating harbor-db     ... done
Creating registry      ... done
Creating registryctl   ... done
Creating harbor-portal ... done
Creating redis         ... done
Creating harbor-core   ... done
Creating nginx             ... done
Creating harbor-jobservice ... done
✔ ----Harbor has been installed and started successfully.----

#安装harbor后会自动启动很多相关容器
root@ubuntu-18:~/harbor# docker ps -a
CONTAINER ID   IMAGE                                COMMAND                  CREATED          STATUS                    PORTS                                   NAMES
0811d546d2fe   goharbor/harbor-jobservice:v2.3.2    "/harbor/entrypoint.…"   35 seconds ago   Up 32 seconds (healthy)                                           harbor-jobservice
6ed85537833e   goharbor/nginx-photon:v2.3.2         "nginx -g 'daemon of…"   35 seconds ago   Up 31 seconds (healthy)   0.0.0.0:80->8080/tcp, :::80->8080/tcp   nginx
156e548a6556   goharbor/harbor-core:v2.3.2          "/harbor/entrypoint.…"   36 seconds ago   Up 34 seconds (healthy)                                           harbor-core
c8feec1ba07d   goharbor/redis-photon:v2.3.2         "redis-server /etc/r…"   39 seconds ago   Up 36 seconds (healthy)                                           redis
ae6b65cd166c   goharbor/registry-photon:v2.3.2      "/home/harbor/entryp…"   39 seconds ago   Up 37 seconds (healthy)                                           registry
169b78a01c08   goharbor/harbor-registryctl:v2.3.2   "/home/harbor/start.…"   39 seconds ago   Up 37 seconds (healthy)                                           registryctl
d5f23f0f9983   goharbor/harbor-portal:v2.3.2        "nginx -g 'daemon of…"   39 seconds ago   Up 36 seconds (healthy)                                           harbor-portal
ff92d24071e5   goharbor/harbor-db:v2.3.2            "/docker-entrypoint.…"   39 seconds ago   Up 35 seconds (healthy)                                           harbor-db
f56a8d248a9b   goharbor/harbor-log:v2.3.2           "/bin/sh -c /usr/loc…"   40 seconds ago   Up 39 seconds (healthy)   127.0.0.1:1514->10514/tcp               harbor-log
10.2.2.5 实现开机自动启动 harbor
方法一:通过service文件实现
root@ubuntu-18:~/harbor# vim /lib/systemd/system/harbor.service
[Unit]
Description=Harbor
After=docker.service systemd-networkd.service systemd-resolved.service
Requires=docker.service

[Service]
Type=simple
Restart=on-failure
RestartSec=5
ExecStart=/usr/local/bin/docker-compose -f /apps/harbor/docker-compose.yml up
ExecStop=/usr/local/bin/docker-compose -f /apps/harbor/docker-compose.yml down

[Install]
WantedBy=multi-user.target

root@ubuntu-18:~/harbor# systemctl daemon-reload
root@ubuntu-18:~/harbor# systemctl enable harbor
方法二:通过/etc/rc.local实现
- Ubuntu实现/etc/rc.local
root@ubuntu-18:~# vim /lib/systemd/system/rc.local.service
[Unit]
Description=/etc/rc.local Compatibility
Documentation=man:systemd-rc-local-generator(8)
ConditionFileIsExecutable=/etc/rc.local
After=network.target

[Service]
Type=forking
ExecStart=/etc/rc.local start
TimeoutSec=0
RemainAfterExit=yes
GuessMainPID=no

[Install]
WantedBy=mutli-user.target

root@ubuntu-18:~# systemctl daemon-reload
root@ubuntu-18:~# systemctl enable --now rc.local.service
root@ubuntu-18:~# vim /etc/rc.local

#!/bin/bash
cd /apps/harbor
/usr/local/bin/docker-compose up -d

root@ubuntu-18:~# chmod +x /etc/rc.local- CentOS实现rc.local
[root@centos8-1 ~]# cat /etc/rc.d/rc.local
#!/bin/bash
# THIS FILE IS ADDED FOR COMPATIBILITY PURPOSES
#
# It is highly advisable to create own systemd services or udev rules
# to run scripts during boot instead of using this file.
#
# In contrast to previous versions due to parallel execution during boot
# this script will NOT be run after all other services.
#
# Please note that you must run 'chmod +x /etc/rc.d/rc.local' to ensure
# that this script will be executed during boot.

cd /apps/harbor
/usr/local/bin/docker-compose up -d
[root@centos8-1 ~]# chmod +x /etc/rc.d/rc.local
10.2.2.6 登陆 harbor 主机网站
用浏览器访问:http://10.0.0.110
- 用户名:admin
- 密码:前面harbor.yml中指定的密码
10.2.3 使用harbor
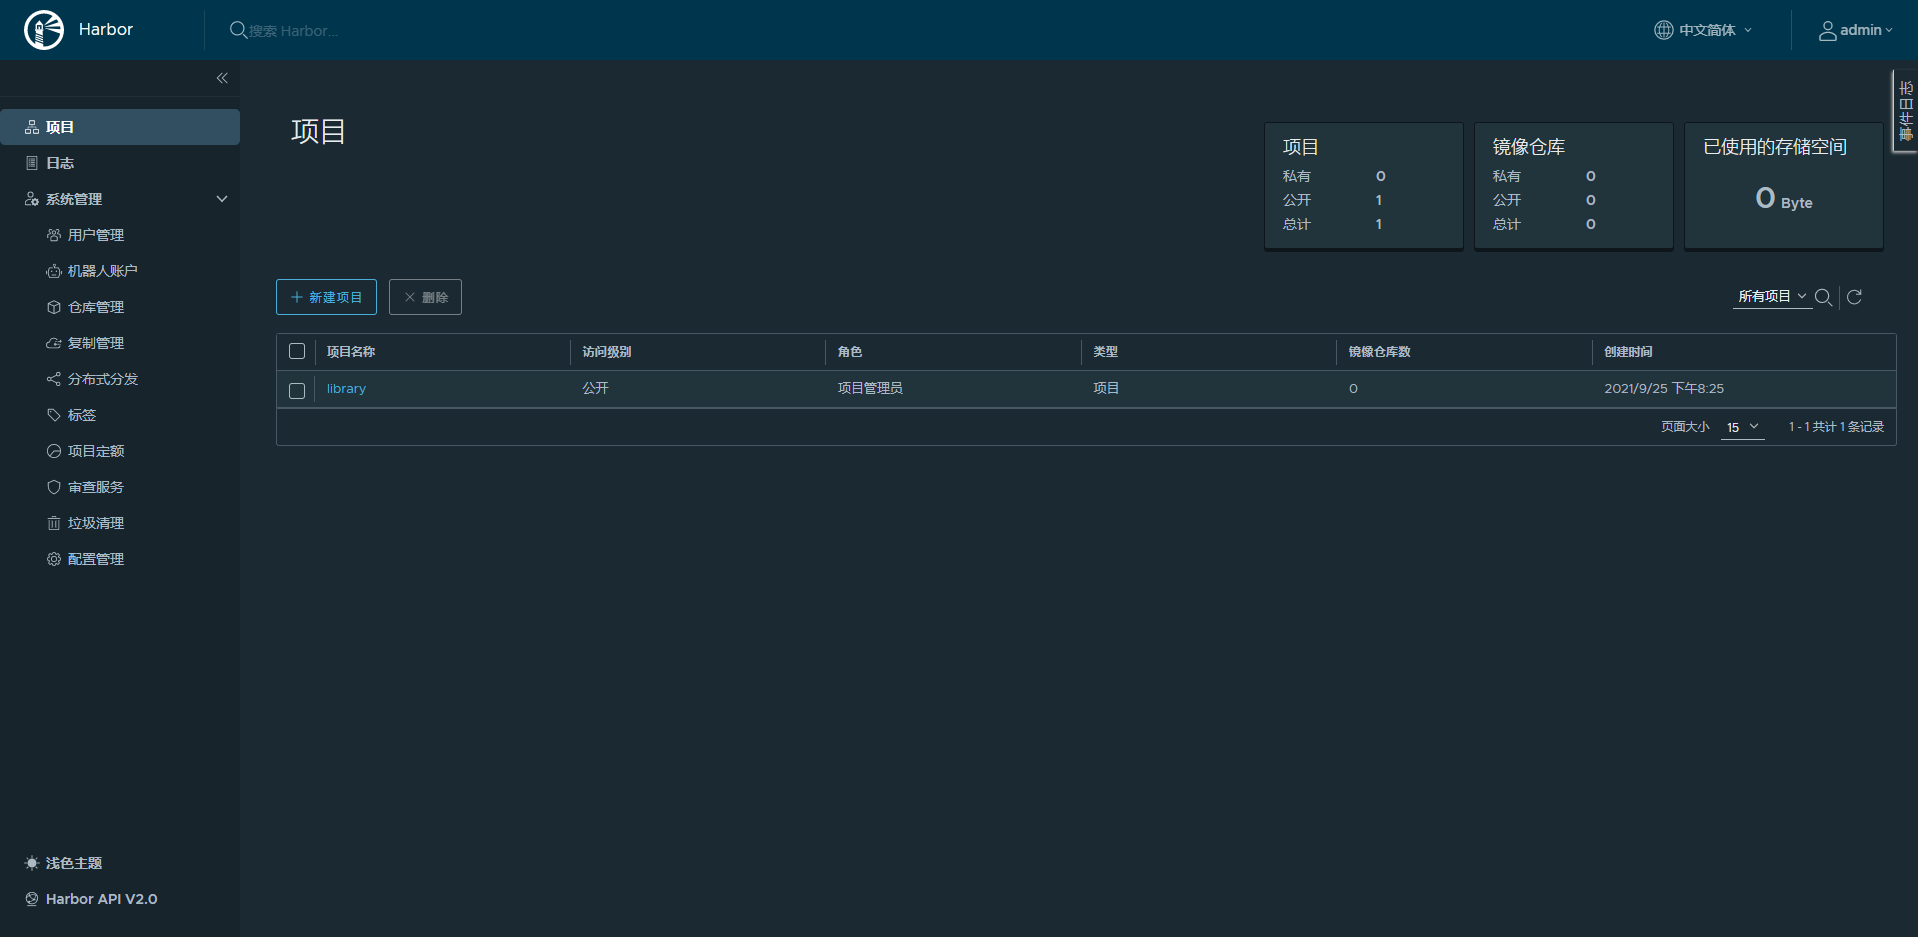
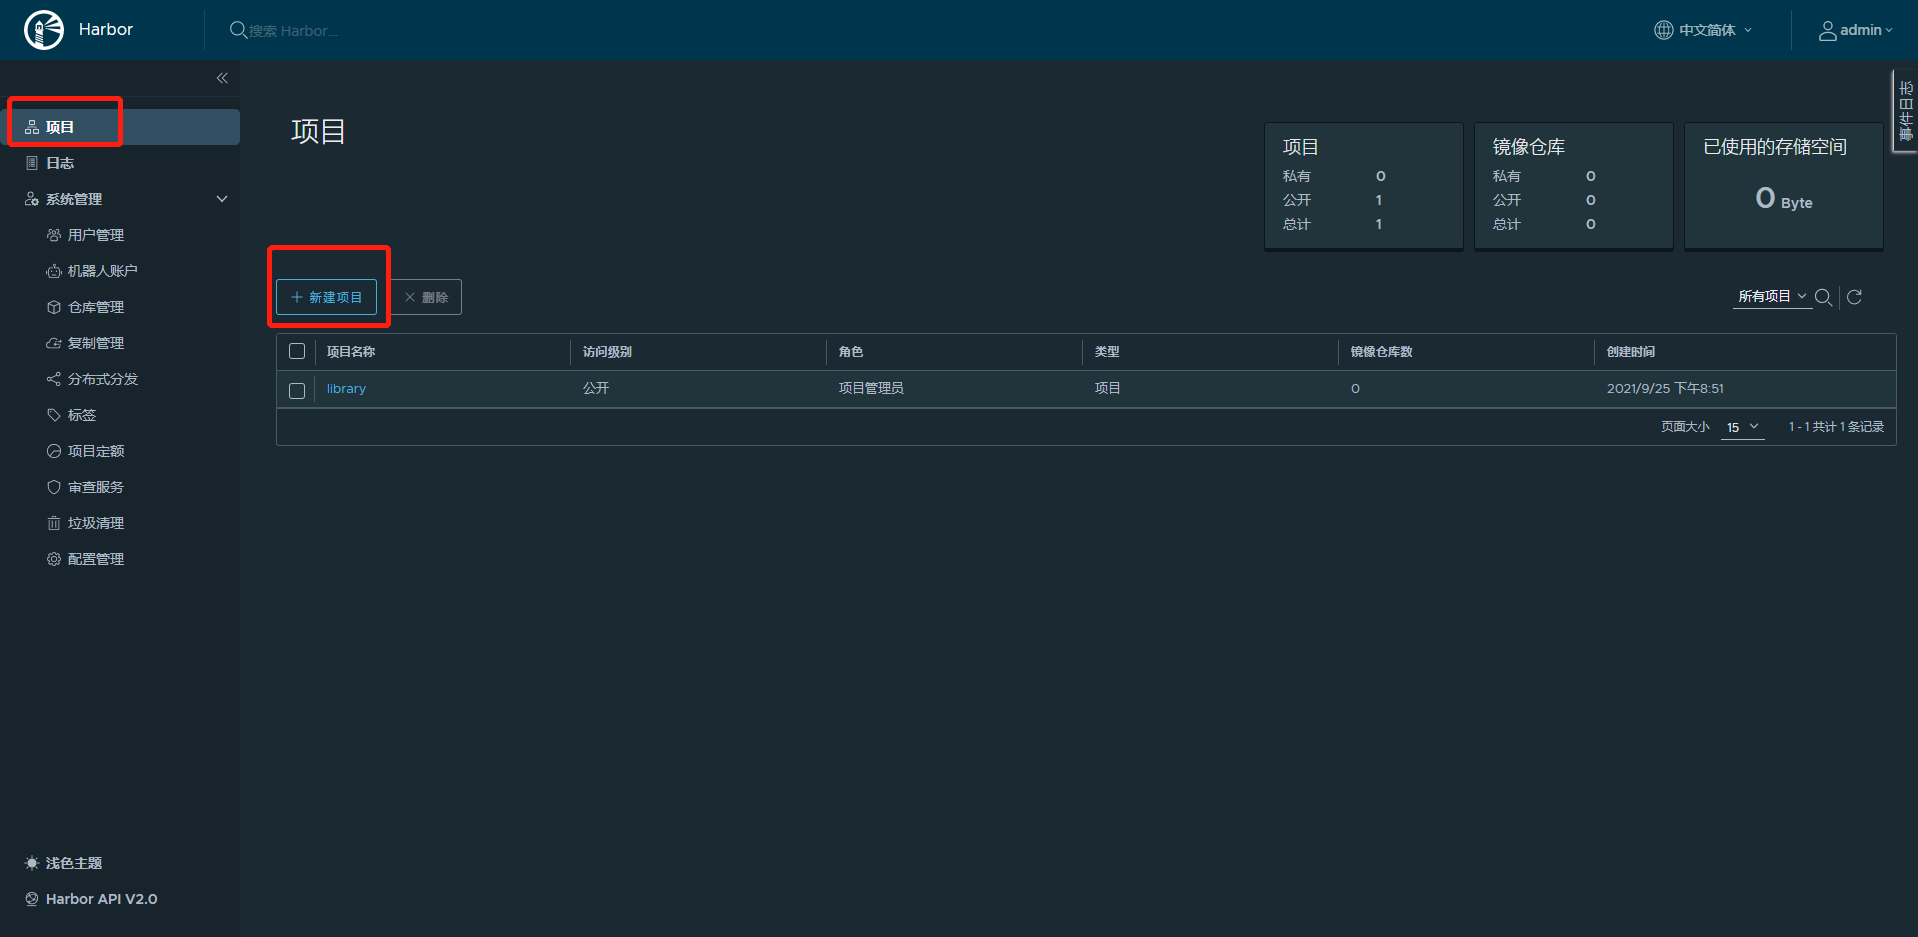
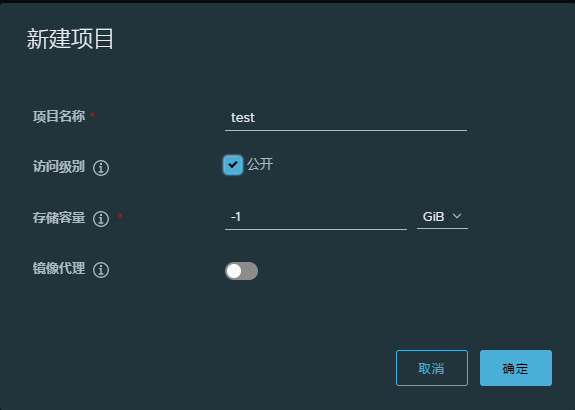
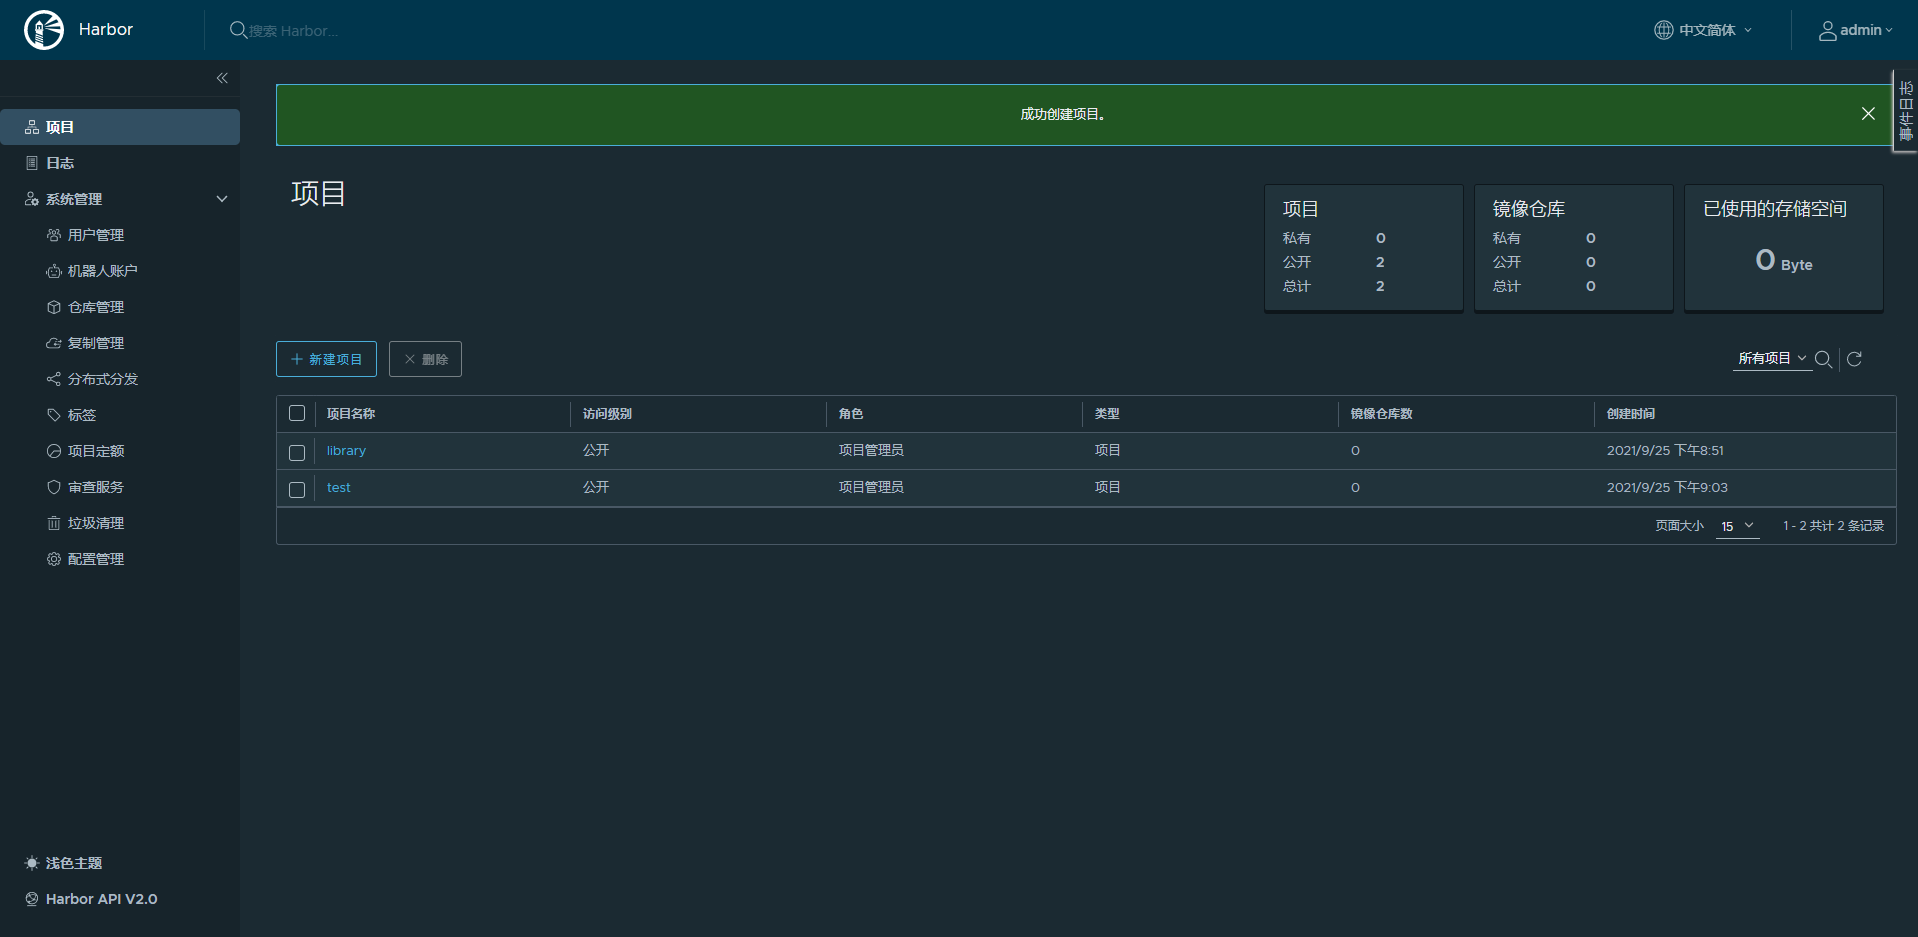
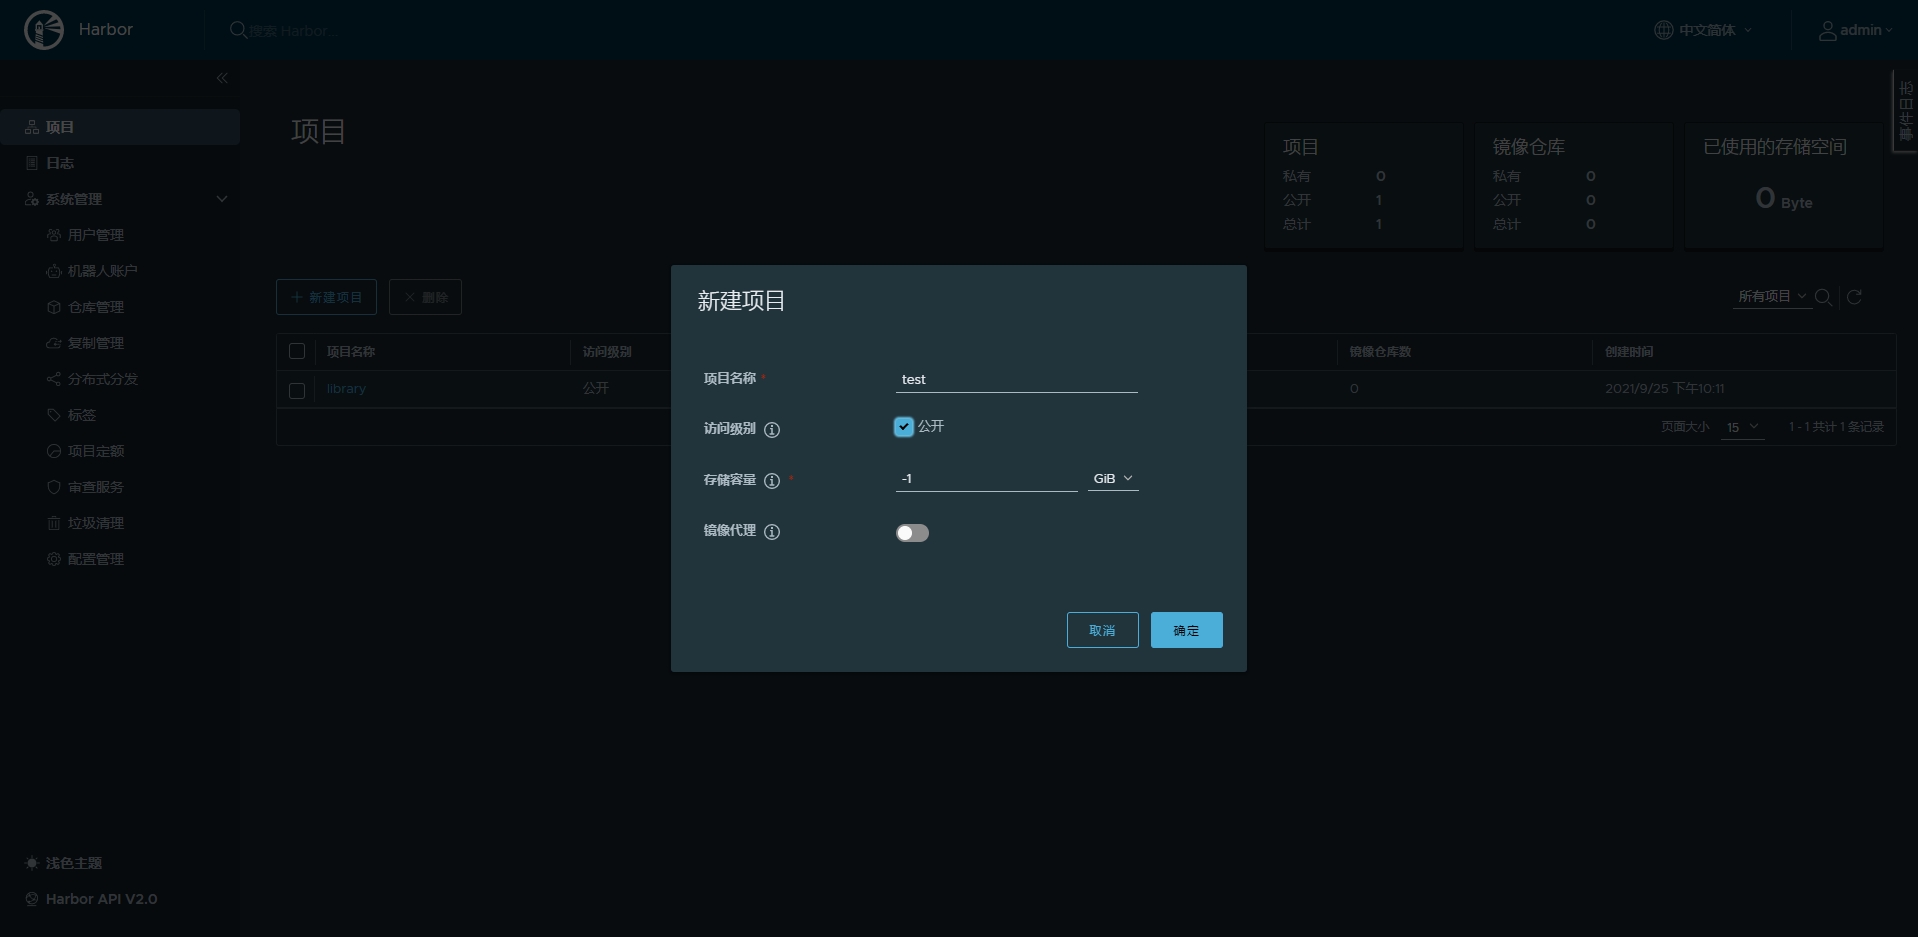
10.2.3.1 建立项目
harbor上必须先建立项目,才能上传镜像
10.2.3.2 在客户端主机上命令行登陆harbor
安全问题,docker会自动拒绝登陆,导致登陆失败
root@ubuntu-2010:~# docker login 10.0.0.110
Username: admin
Password:
Error response from daemon: Get "https://10.0.0.110/v2/": dial tcp 10.0.0.110:443: connect: connection refused
root@ubuntu-2010:~# docker login 10.0.0.110:80
Username: admin
Password:
Error response from daemon: Get "https://10.0.0.110:80/v2/": http: server gave HTTP response to HTTPS client
root@ubuntu-2010:~#
在service文件或在daemon.json文件上添加安全仓库
注意:若访问https或者其他端口,要在地址后添加:port
[root@centos8-3 ~]# vim /etc/docker/daemon.json

{
  "registry-mirrors":["https://hub-mirror.c.163.com"],
  "insecure-registries": ["10.0.0.110", "10.0.0.120"]
}

#或者修改service文件
ExecStart=/usr/bin/dockerd -H fd:// --containerd=/run/containerd/containerd.sock --insecure-registry 10.0.0.110 --insecure-registry 10.0.0.120

root@ubuntu-2010:~# systemctl daemon-reload
root@ubuntu-2010:~# systemctl restart docker

root@ubuntu-2010:~# docker login 10.0.0.110
Username: admin
Password:
WARNING! Your password will be stored unencrypted in /root/.docker/config.json.
Configure a credential helper to remove this warning. See
https://docs.docker.com/engine/reference/commandline/login/#credentials-store

Login Succeeded

#查看进程是否添加上面设置
root@ubuntu-2010:~# ps aux|grep dockerd
root       12297  0.0  1.9 1384712 79220 ?       Ssl  13:26   0:00 /usr/bin/dockerd -H fd:// --containerd=/run/containerd/containerd.sock --insecure-registry 10.0.0.110 --insecure-registry 10.0.0.120

root@ubuntu-2010:~# cat .docker/config.json
{
	"auths": {
		"10.0.0.110": {
			"auth": "YWRtaW46MTIzNDU2"
		},
		"10.0.0.110:80": {
			"auth": "YWRtaW46MTIzNDU2"
		}
	}
}
10.2.3.3 给本地镜像打标签并上传到harbor
修改images的tag,不修改成指定格式无法将镜像上传到harbor仓库
格式为:
Harbor主机地址/项目名/image_name:version范例:
root@ubuntu-2010:~# docker tag alpine:latest 10.0.0.110/test/alpine:3.14
root@ubuntu-2010:~# docker push 10.0.0.110/test/alpine:3.14
The push refers to repository [10.0.0.110/test/alpine]
e2eb06d8af82: Pushed
3.14: digest: sha256:69704ef328d05a9f806b6b8502915e6a0a4faa4d72018dc42343f511490daf8a size: 528
访问harbor网站验证镜像是否上传成功
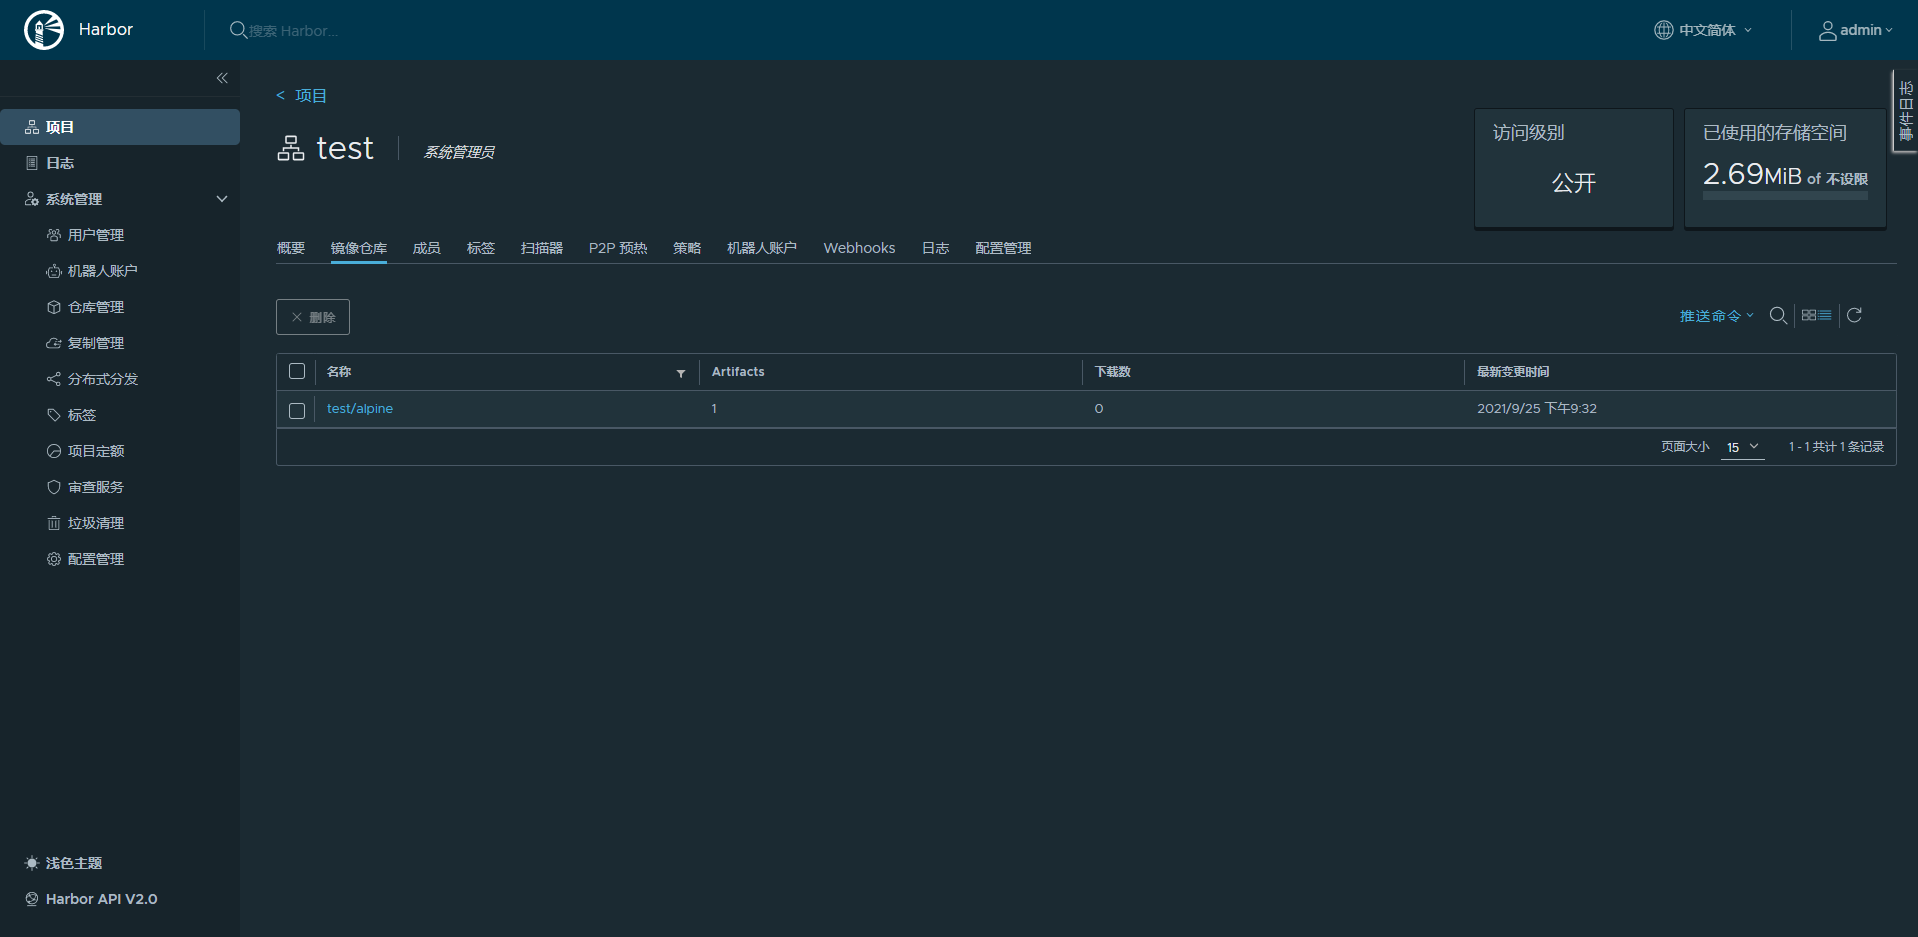
注意:上传镜像前,一定要先建立项目,否则会上传失败
10.2.3.4 下载harbor镜像
在10.0.0.28的Centos8的主机无需登录,即可下载镜像
下载前必须修改docker的service文件,加入harbor服务器地址才可以下载,修改方式如上添加安全仓库一样
[root@centos8-3 ~]# docker pull 10.0.0.110/test/alpine:3.14
3.14: Pulling from test/alpine
a0d0a0d46f8b: Pull complete
Digest: sha256:69704ef328d05a9f806b6b8502915e6a0a4faa4d72018dc42343f511490daf8a
Status: Downloaded newer image for 10.0.0.110/test/alpine:3.14
10.0.0.110/test/alpine:3.14
[root@centos8-3 ~]# docker images
REPOSITORY               TAG       IMAGE ID       CREATED       SIZE
10.0.0.110/test/alpine   3.14      14119a10abf4   4 weeks ago   5.6MB
10.2.4 实现harbor高可用
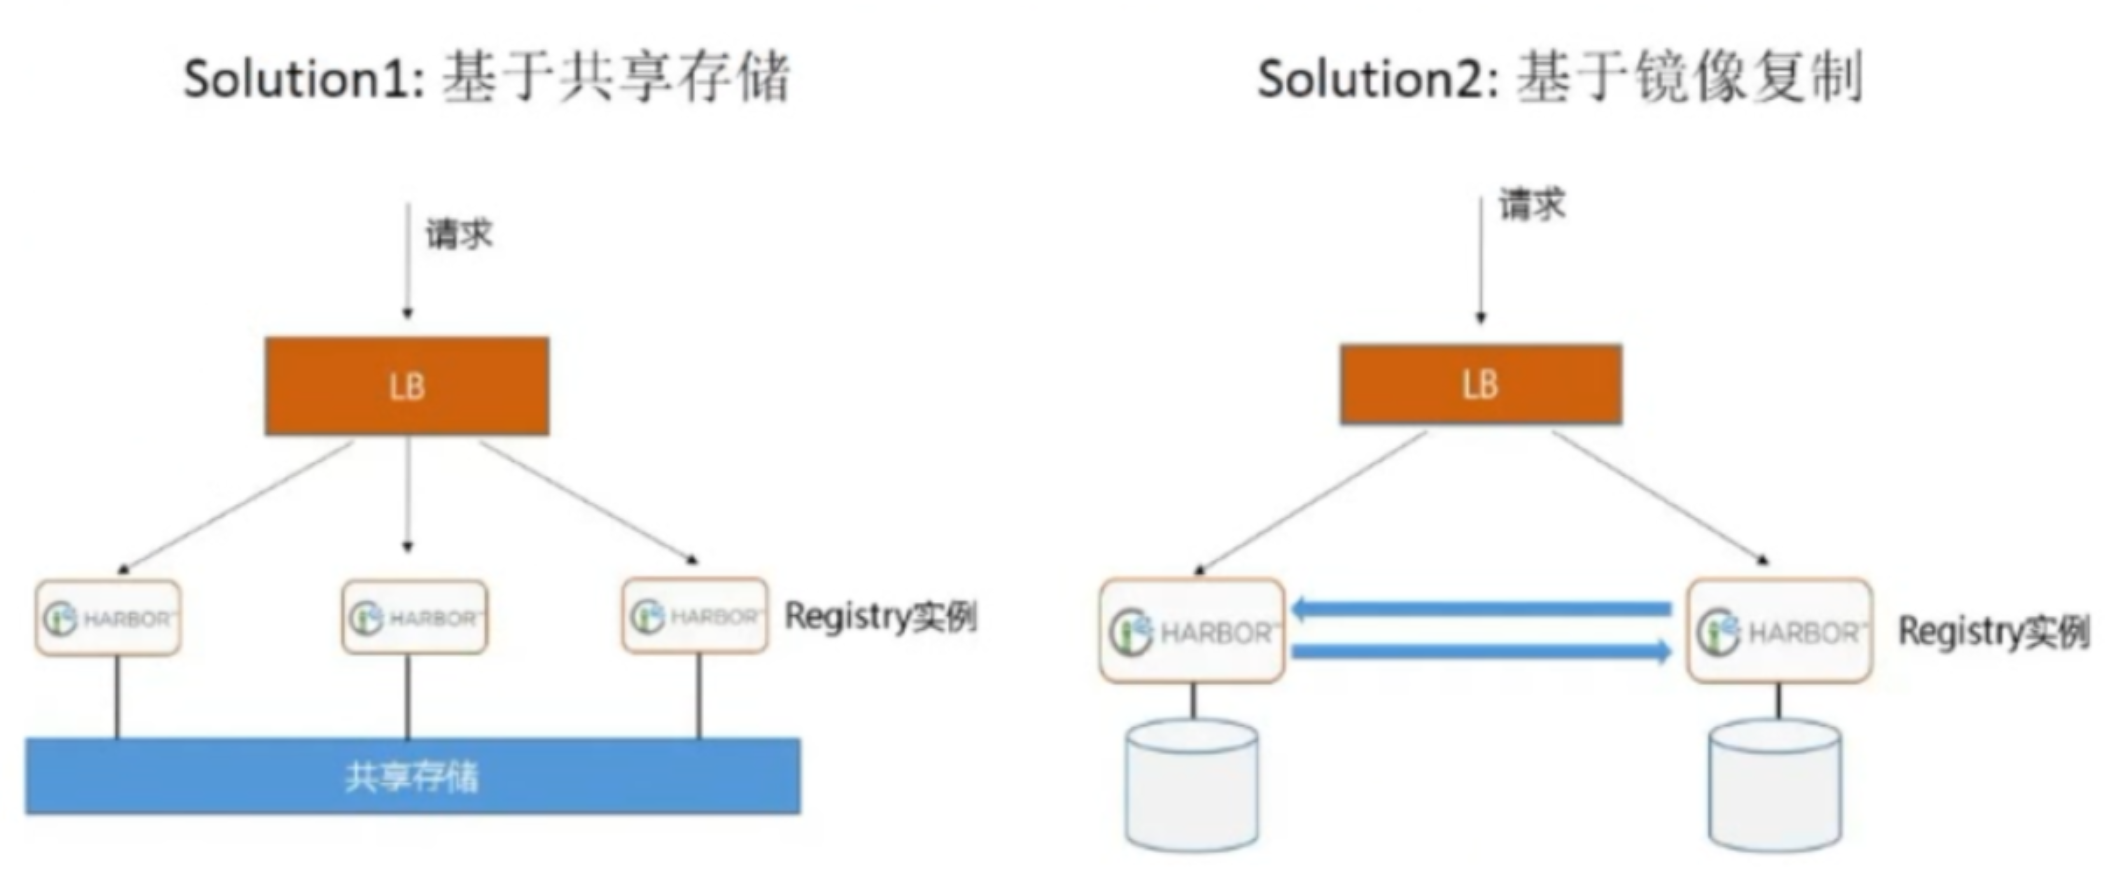
Harbor支持基于策略的Docker镜像复制功能,这类似于MySQL的主从同步,其可以实现不同的数据中心、不同的运行环境之间同步镜像,并提供友好的管理界面,大大简化了实际运维中的镜像管理工作,已经有很多互联网公司使用harbor搭建内网docker仓库的案例,并且还有实现双向复制功能
10.2.4.1 安装第二台harbor主机
参考10.2.2的过程,在第二台主机安装部署好harbor,并登陆系统
10.2.4.2 第二台harbor上新建项目
参考第一台harbor服务器的项目名称,在第二台harbor服务器上新建与之同名的项目
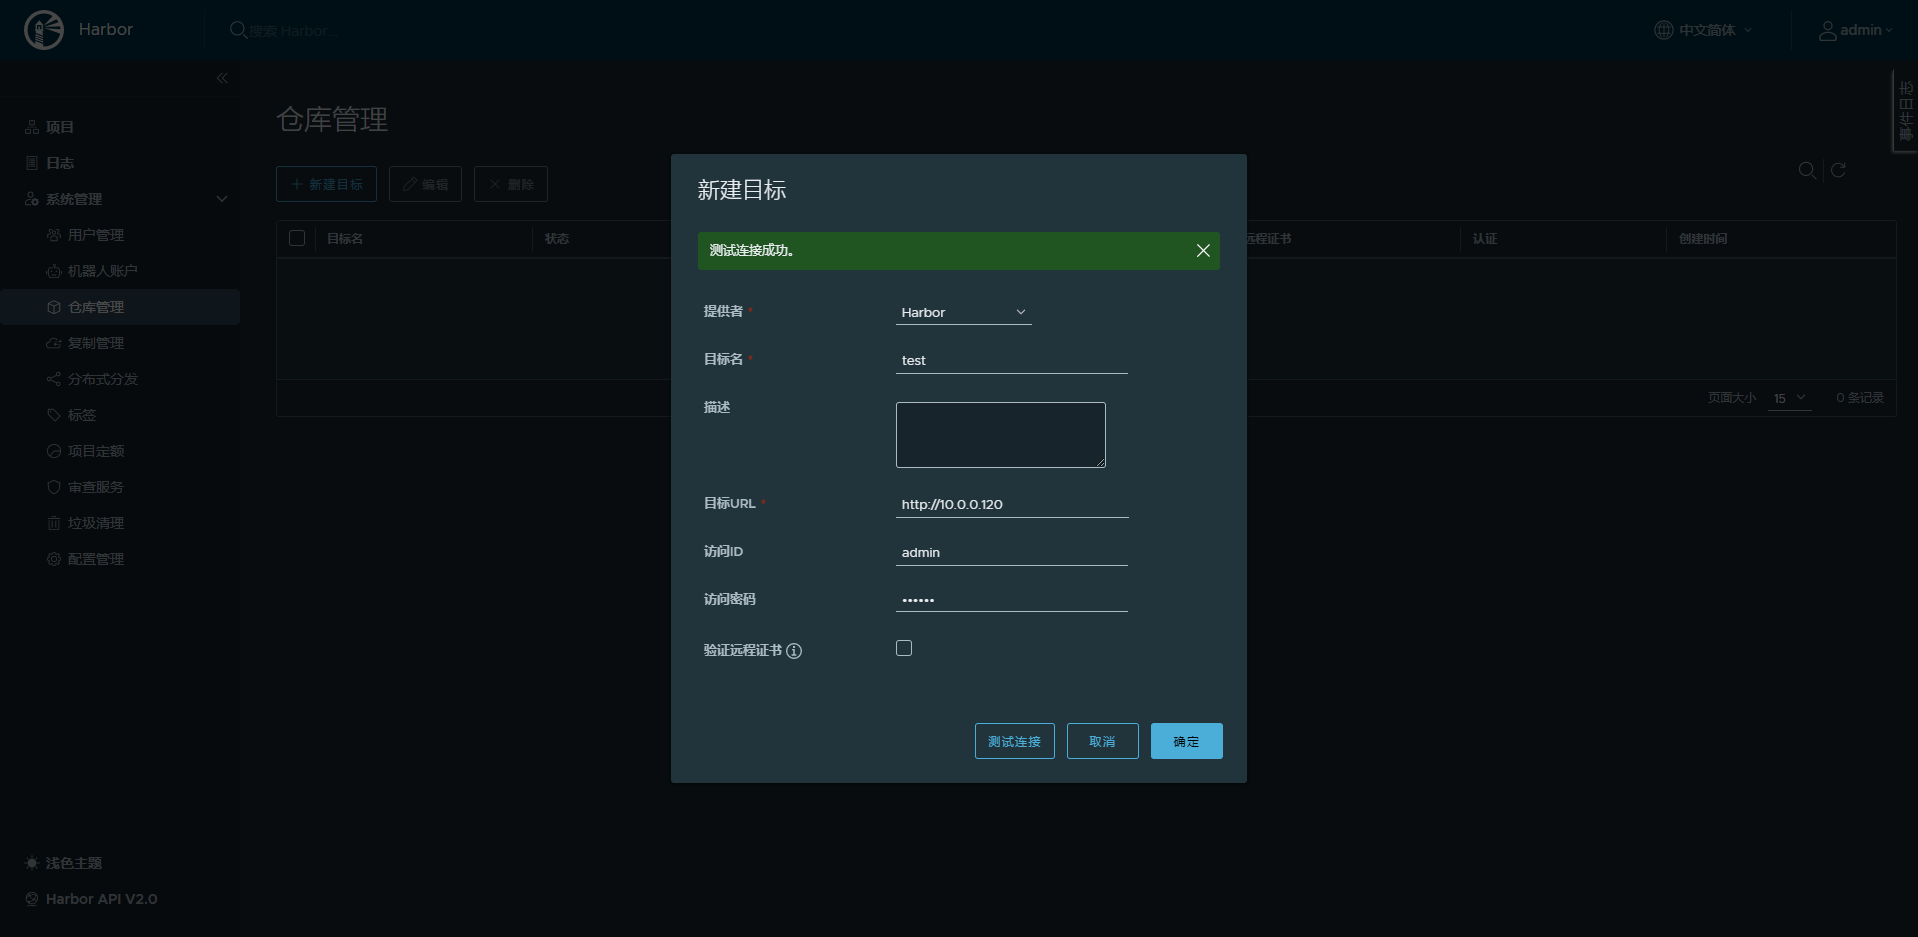
10.2.4.3 在第二台harbor上仓库管理新建目标
参考第一台主机信息,新建复制(同步)目标信息,将第一台主机设置为复制目标

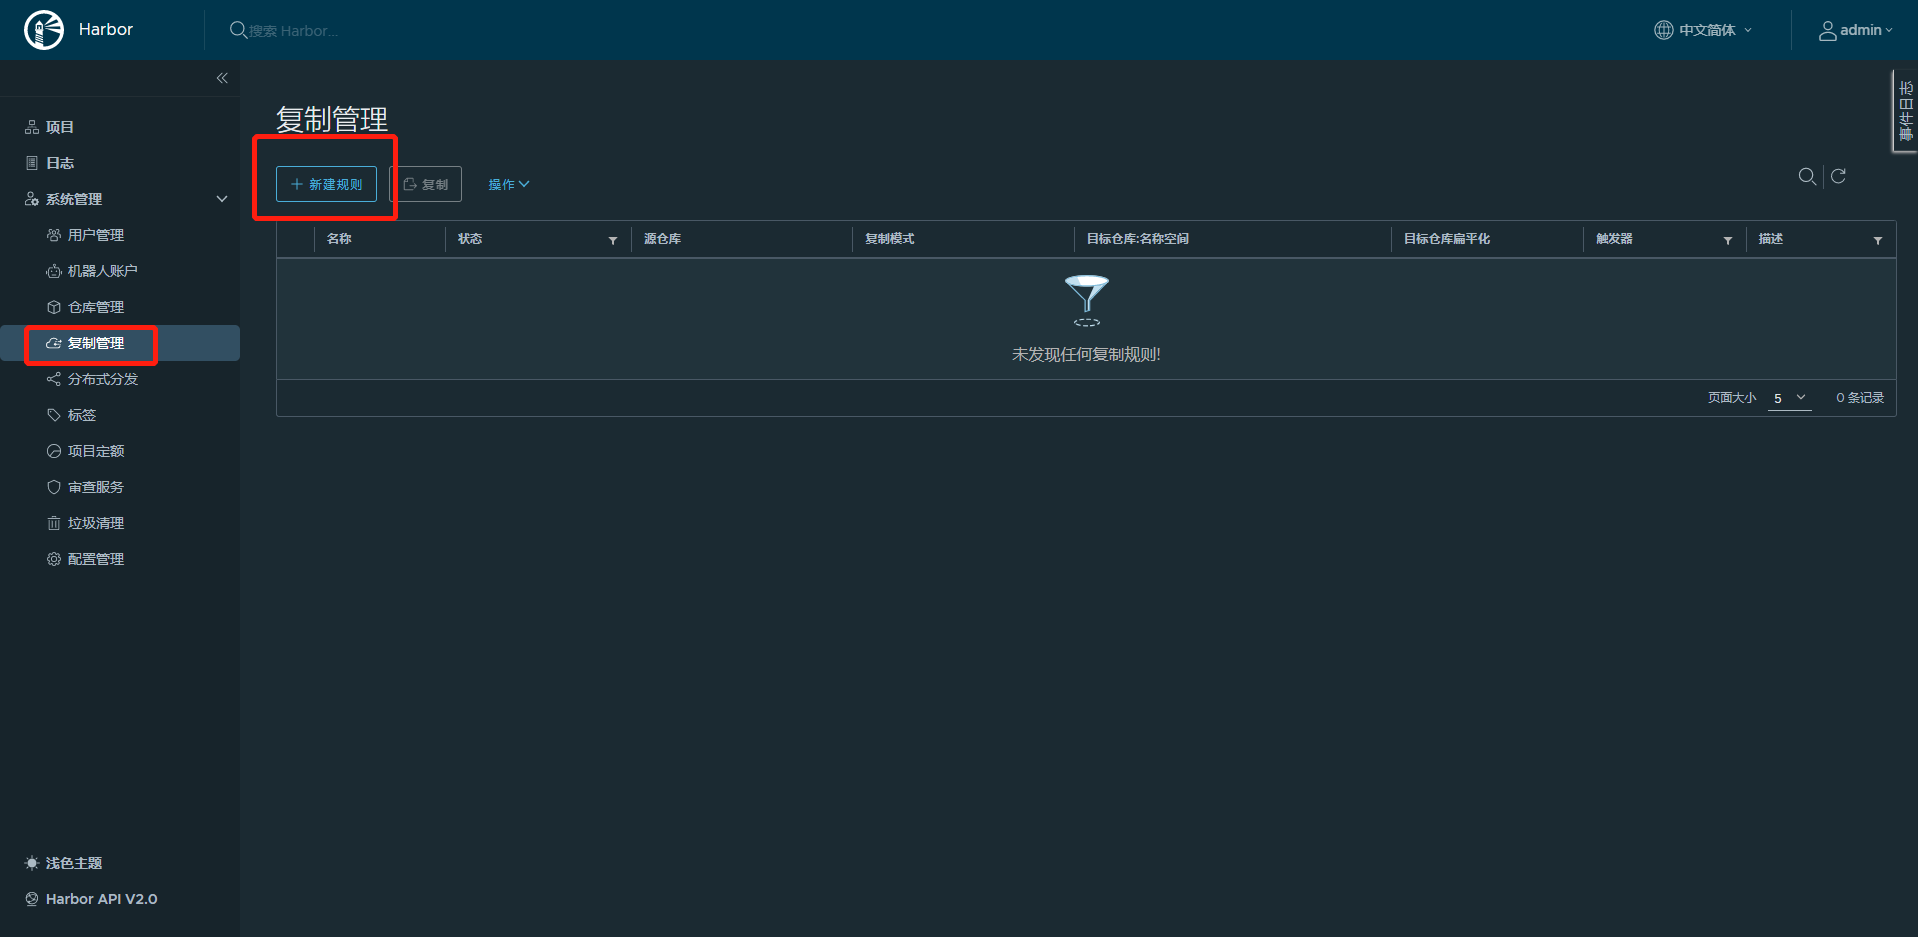
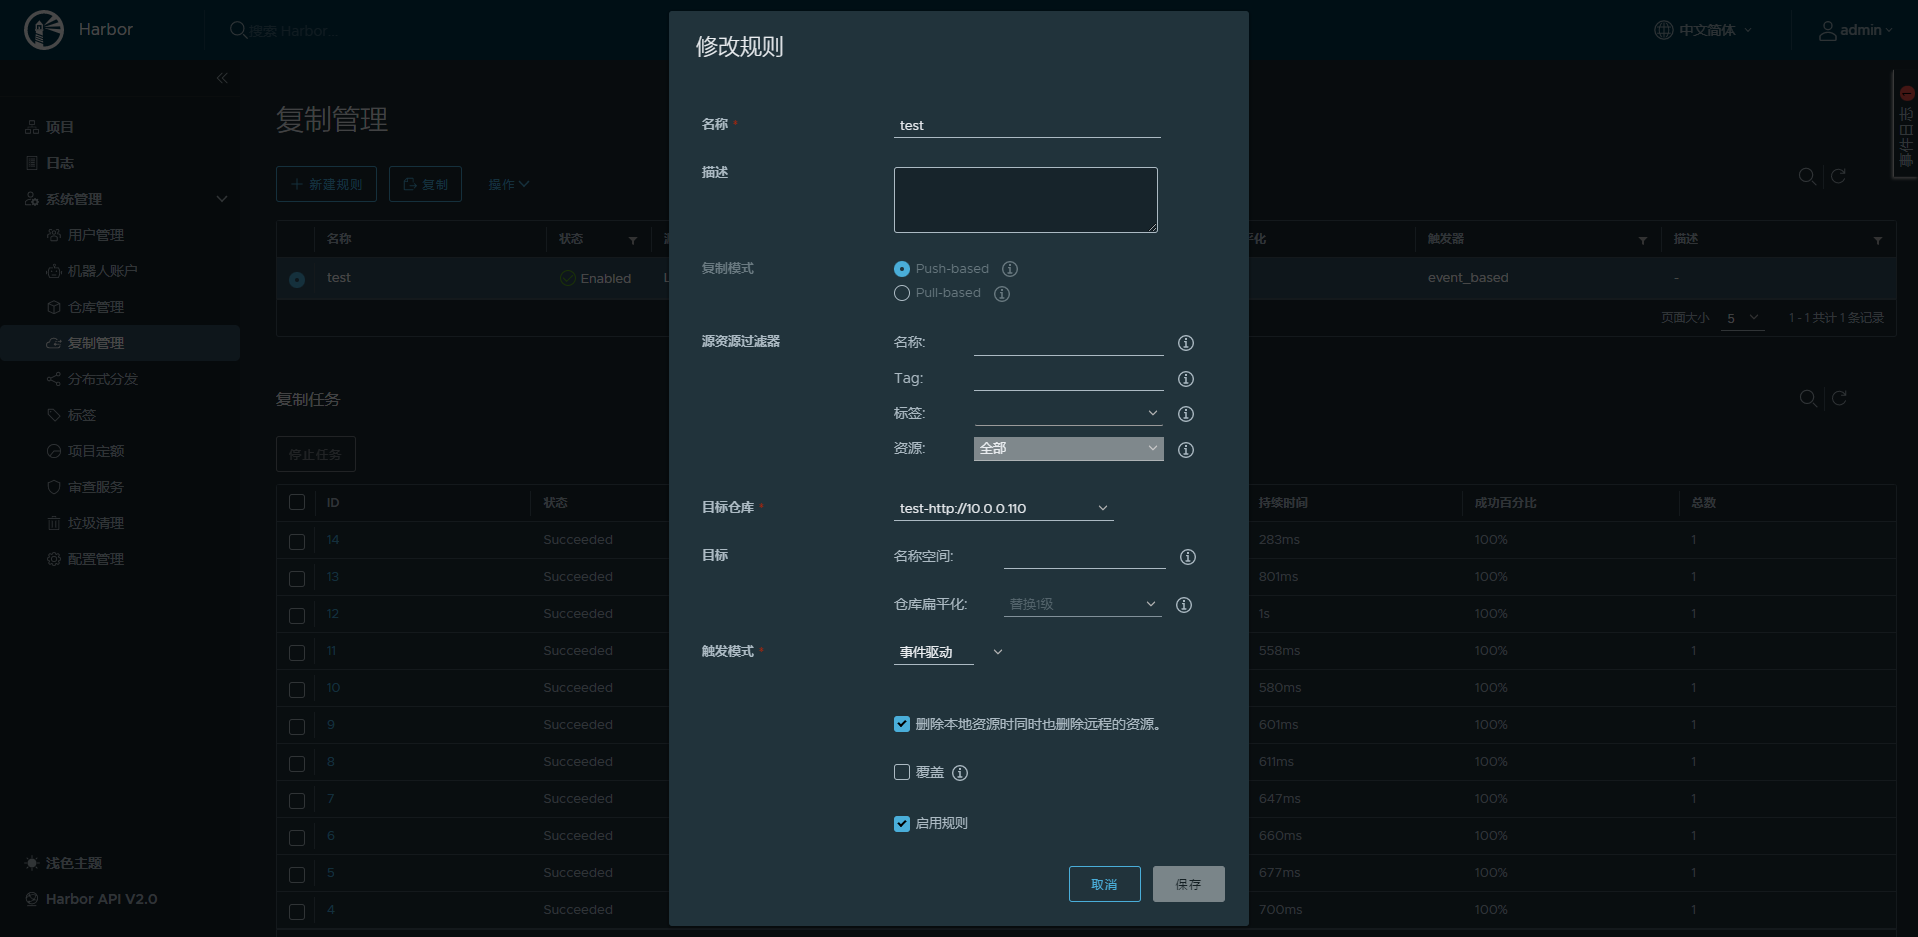
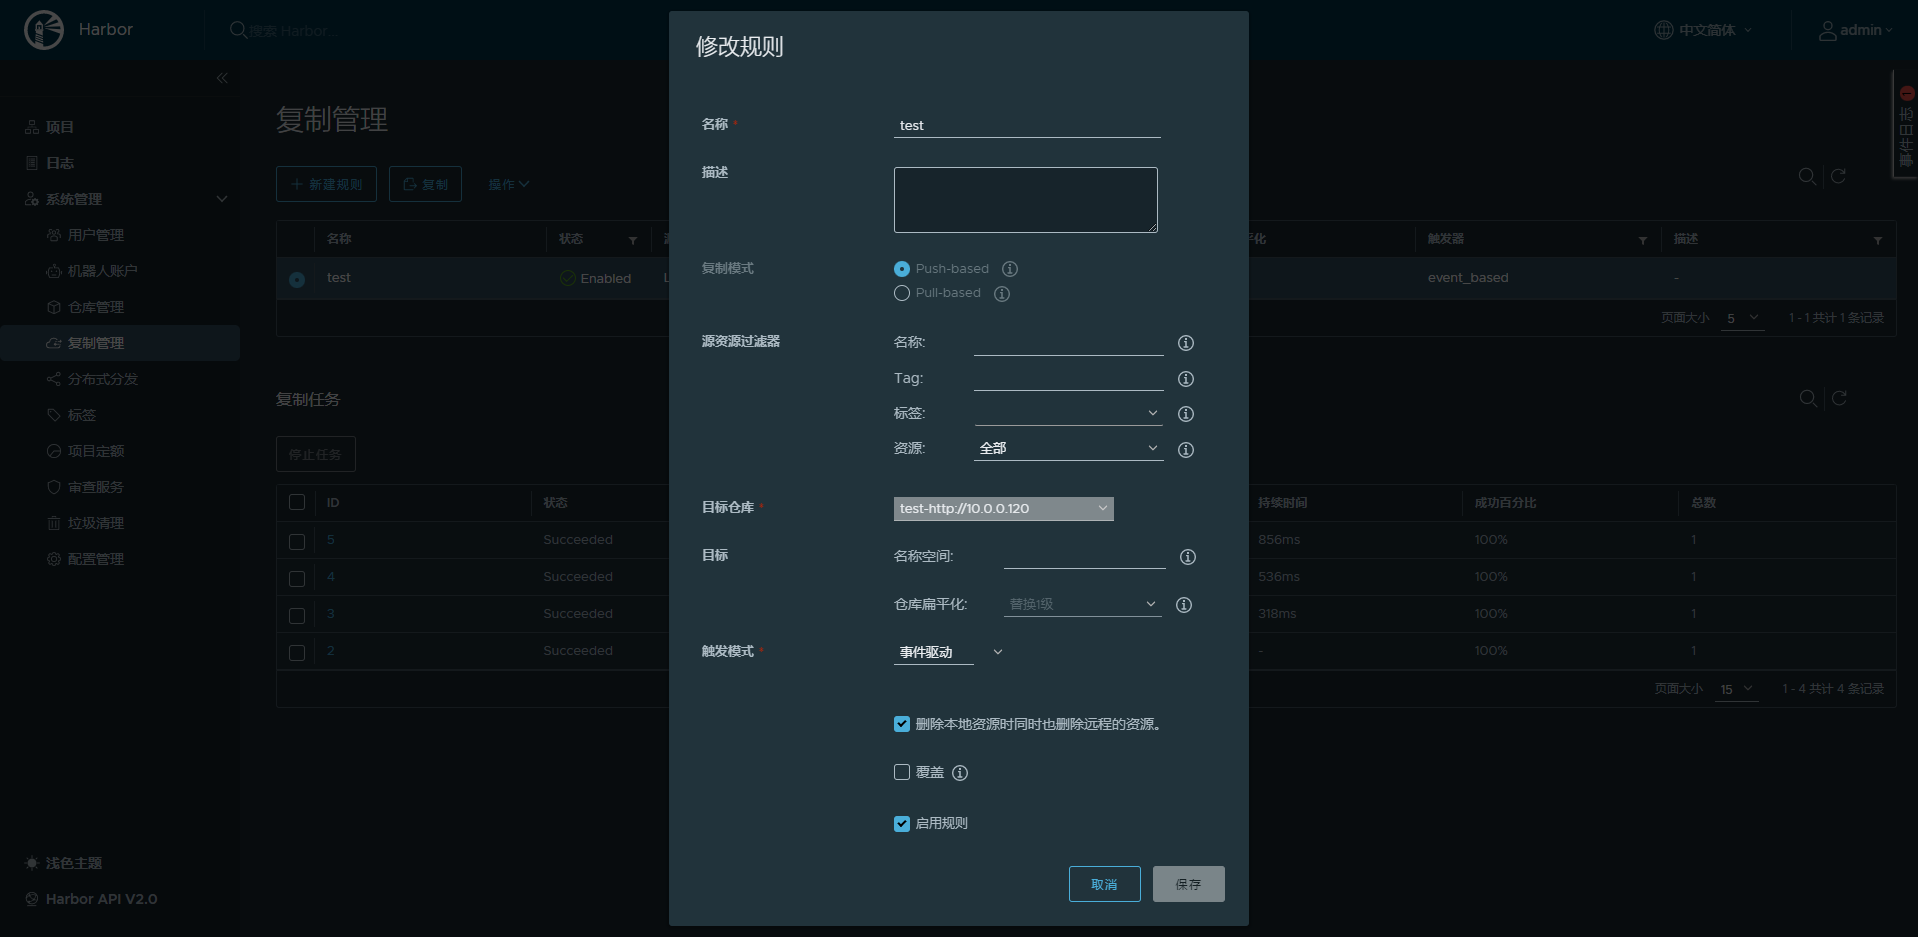
10.2.4.4 在第二台harbor上新建复制规则实现到第一台harbor的单向复制
在第二台harbor上建立复制的目标主机,将第二台harbor上面的镜像复制到第一台harbor上
10.2.4.5 在第一台harbor主机上重复上面的操作
以上操作,只是实现了从第二台harbor主机10.0.0.120到第一台主机10.0.0.110的单向同步
在第一台harbor上再执行下面操作,才实现双向同步
10.2.5 harbor 安全https配置
harbor默认使用http,为了安全,可以使用https
参考文档:https://goharbor.io/docs/2.3.0/install-config/configure-https/
10.2.5.1 实现Harbor的https认证
#生成私钥和证书
root@ubuntu-2010:/apps/harbor/certs# openssl req -newkey rsa:4096 -nodes -sha256 -keyout ca.key -x509 -subj "/CN=harbor.linux.io" -days 36500 -out ca.crt

#生成harbor主机颁发证书
root@ubuntu-2010:/apps/harbor/certs# openssl req -newkey rsa:4096 -nodes -sha256  -subj "/CN=harbor.linux.io" -keyout harbor.linux.io.key -out harbor.linux.io.csr

#生成 x509 v3 扩展文件
root@ubuntu-2010:/apps/harbor/certs# cat > v3.ext <<-EOF
authorityKeyIdentifier=keyid,issuer
basicConstraints=CA:FALSE
keyUsage = digitalSignature, nonRepudiation, keyEncipherment, dataEncipherment
extendedKeyUsage = serverAuth
subjectAltName = @alt_names

[alt_names]
DNS.1=harbor.linux.io
EOF

#给harbor主机颁发证书
root@ubuntu-2010:/apps/harbor/certs# openssl x509 -req -sha512 -days 3650 -extfile v3.ext -CA ca.crt -CAkey ca.key -CAcreateserial -in harbor.linux.io.csr -out harbor.linux.io.crt

#转换yourdomain.com.crt为yourdomain.com.cert,供 Docker 使用。
Docker 守护进程将.crt文件解释为 CA 证书,将.cert文件解释为客户端证书
openssl x509 -inform PEM -in harbor.linux.io.crt -out harbor.linux.io.cert

root@ubuntu-2010:/apps/harbor/certs# tree /apps/harbor/certs/
/apps/harbor/certs/
├── ca.crt
├── ca.key
├── ca.srl
├── harbor.linux.io.cert
├── harbor.linux.io.crt
├── harbor.linux.io.csr
├── harbor.linux.io.key
└── v3.ext

0 directories, 8 files

root@ubuntu-2010:/apps/harbor# vim /apps/harbor/harbor.yml
hostname: harbor.linux.io
https:

  port: 443
  certificate: /apps/harbor/certs/harbor.linux.io.crt
  private_key: /apps/harbor/certs/harbor.linux.io.key
harbor_admin_password: 123456
root@ubuntu-2010:/apps/harbor# /apps/harbor/install.sh
10.2.5.2 用https方式访问harbor网站
修改/etc/hosts文件
10.0.0.18 harbor.linux.io打开浏览器,访问https://harbor.linux.org,可以看到以下界面(windows也要改解析)
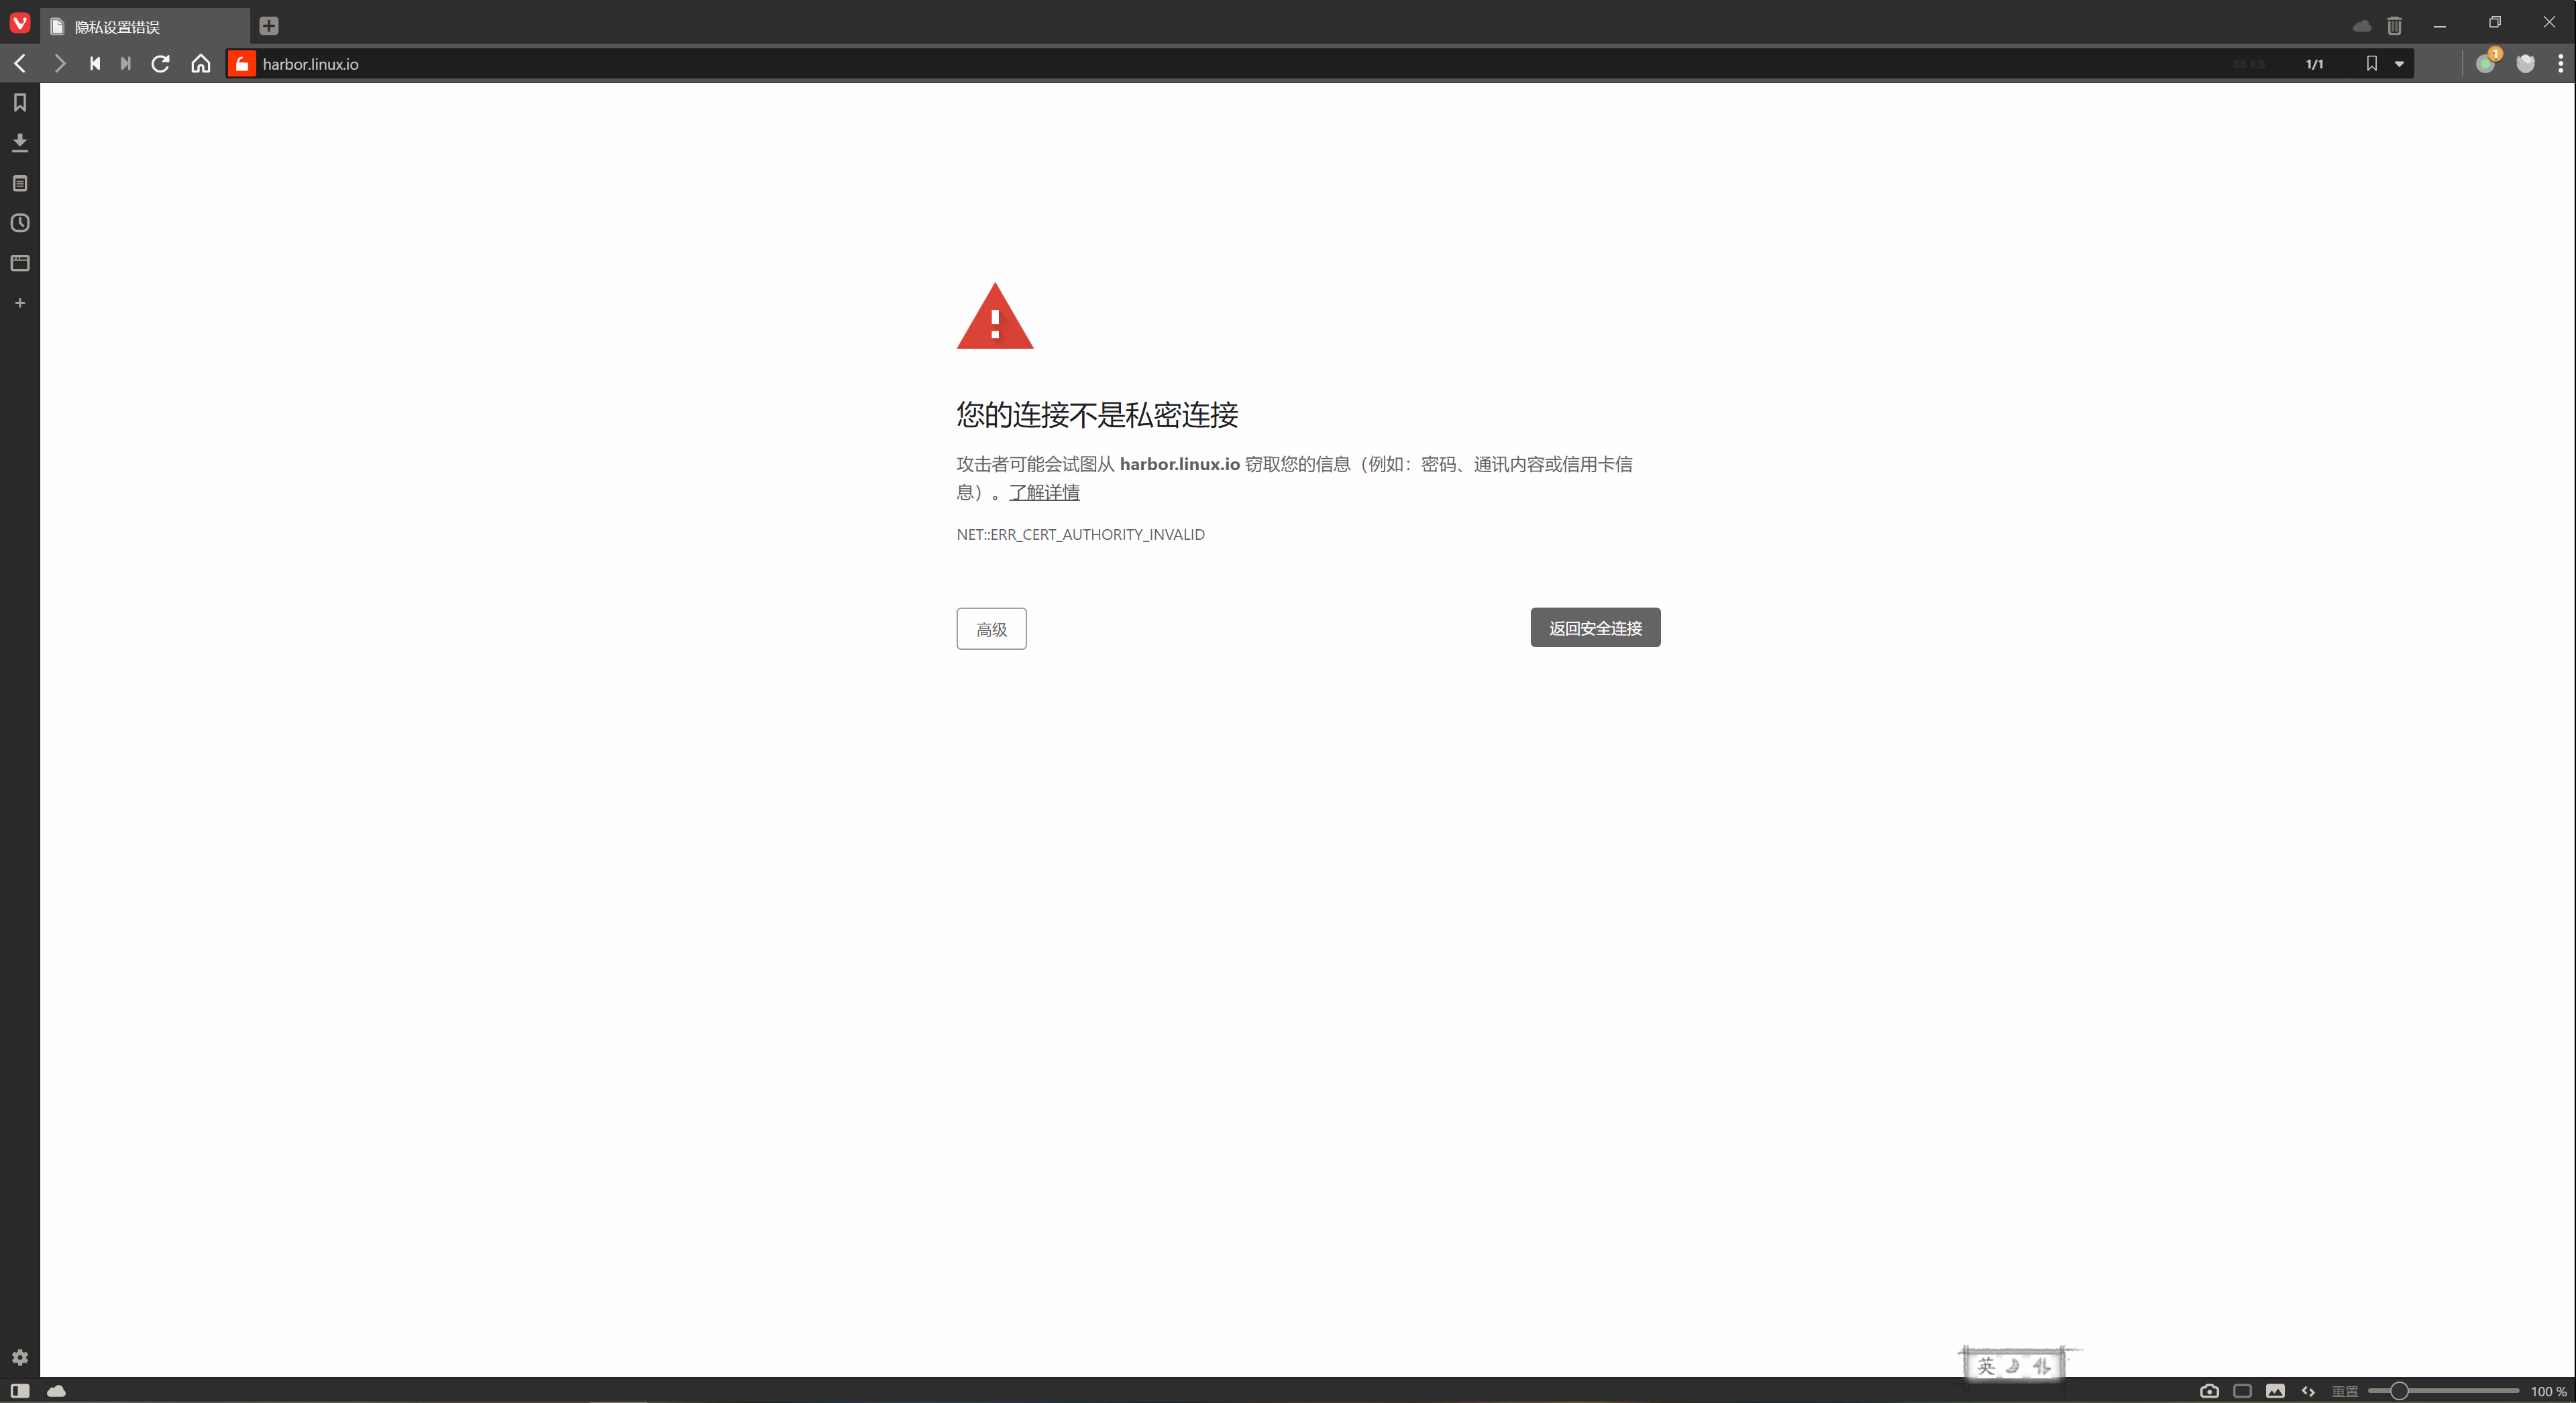
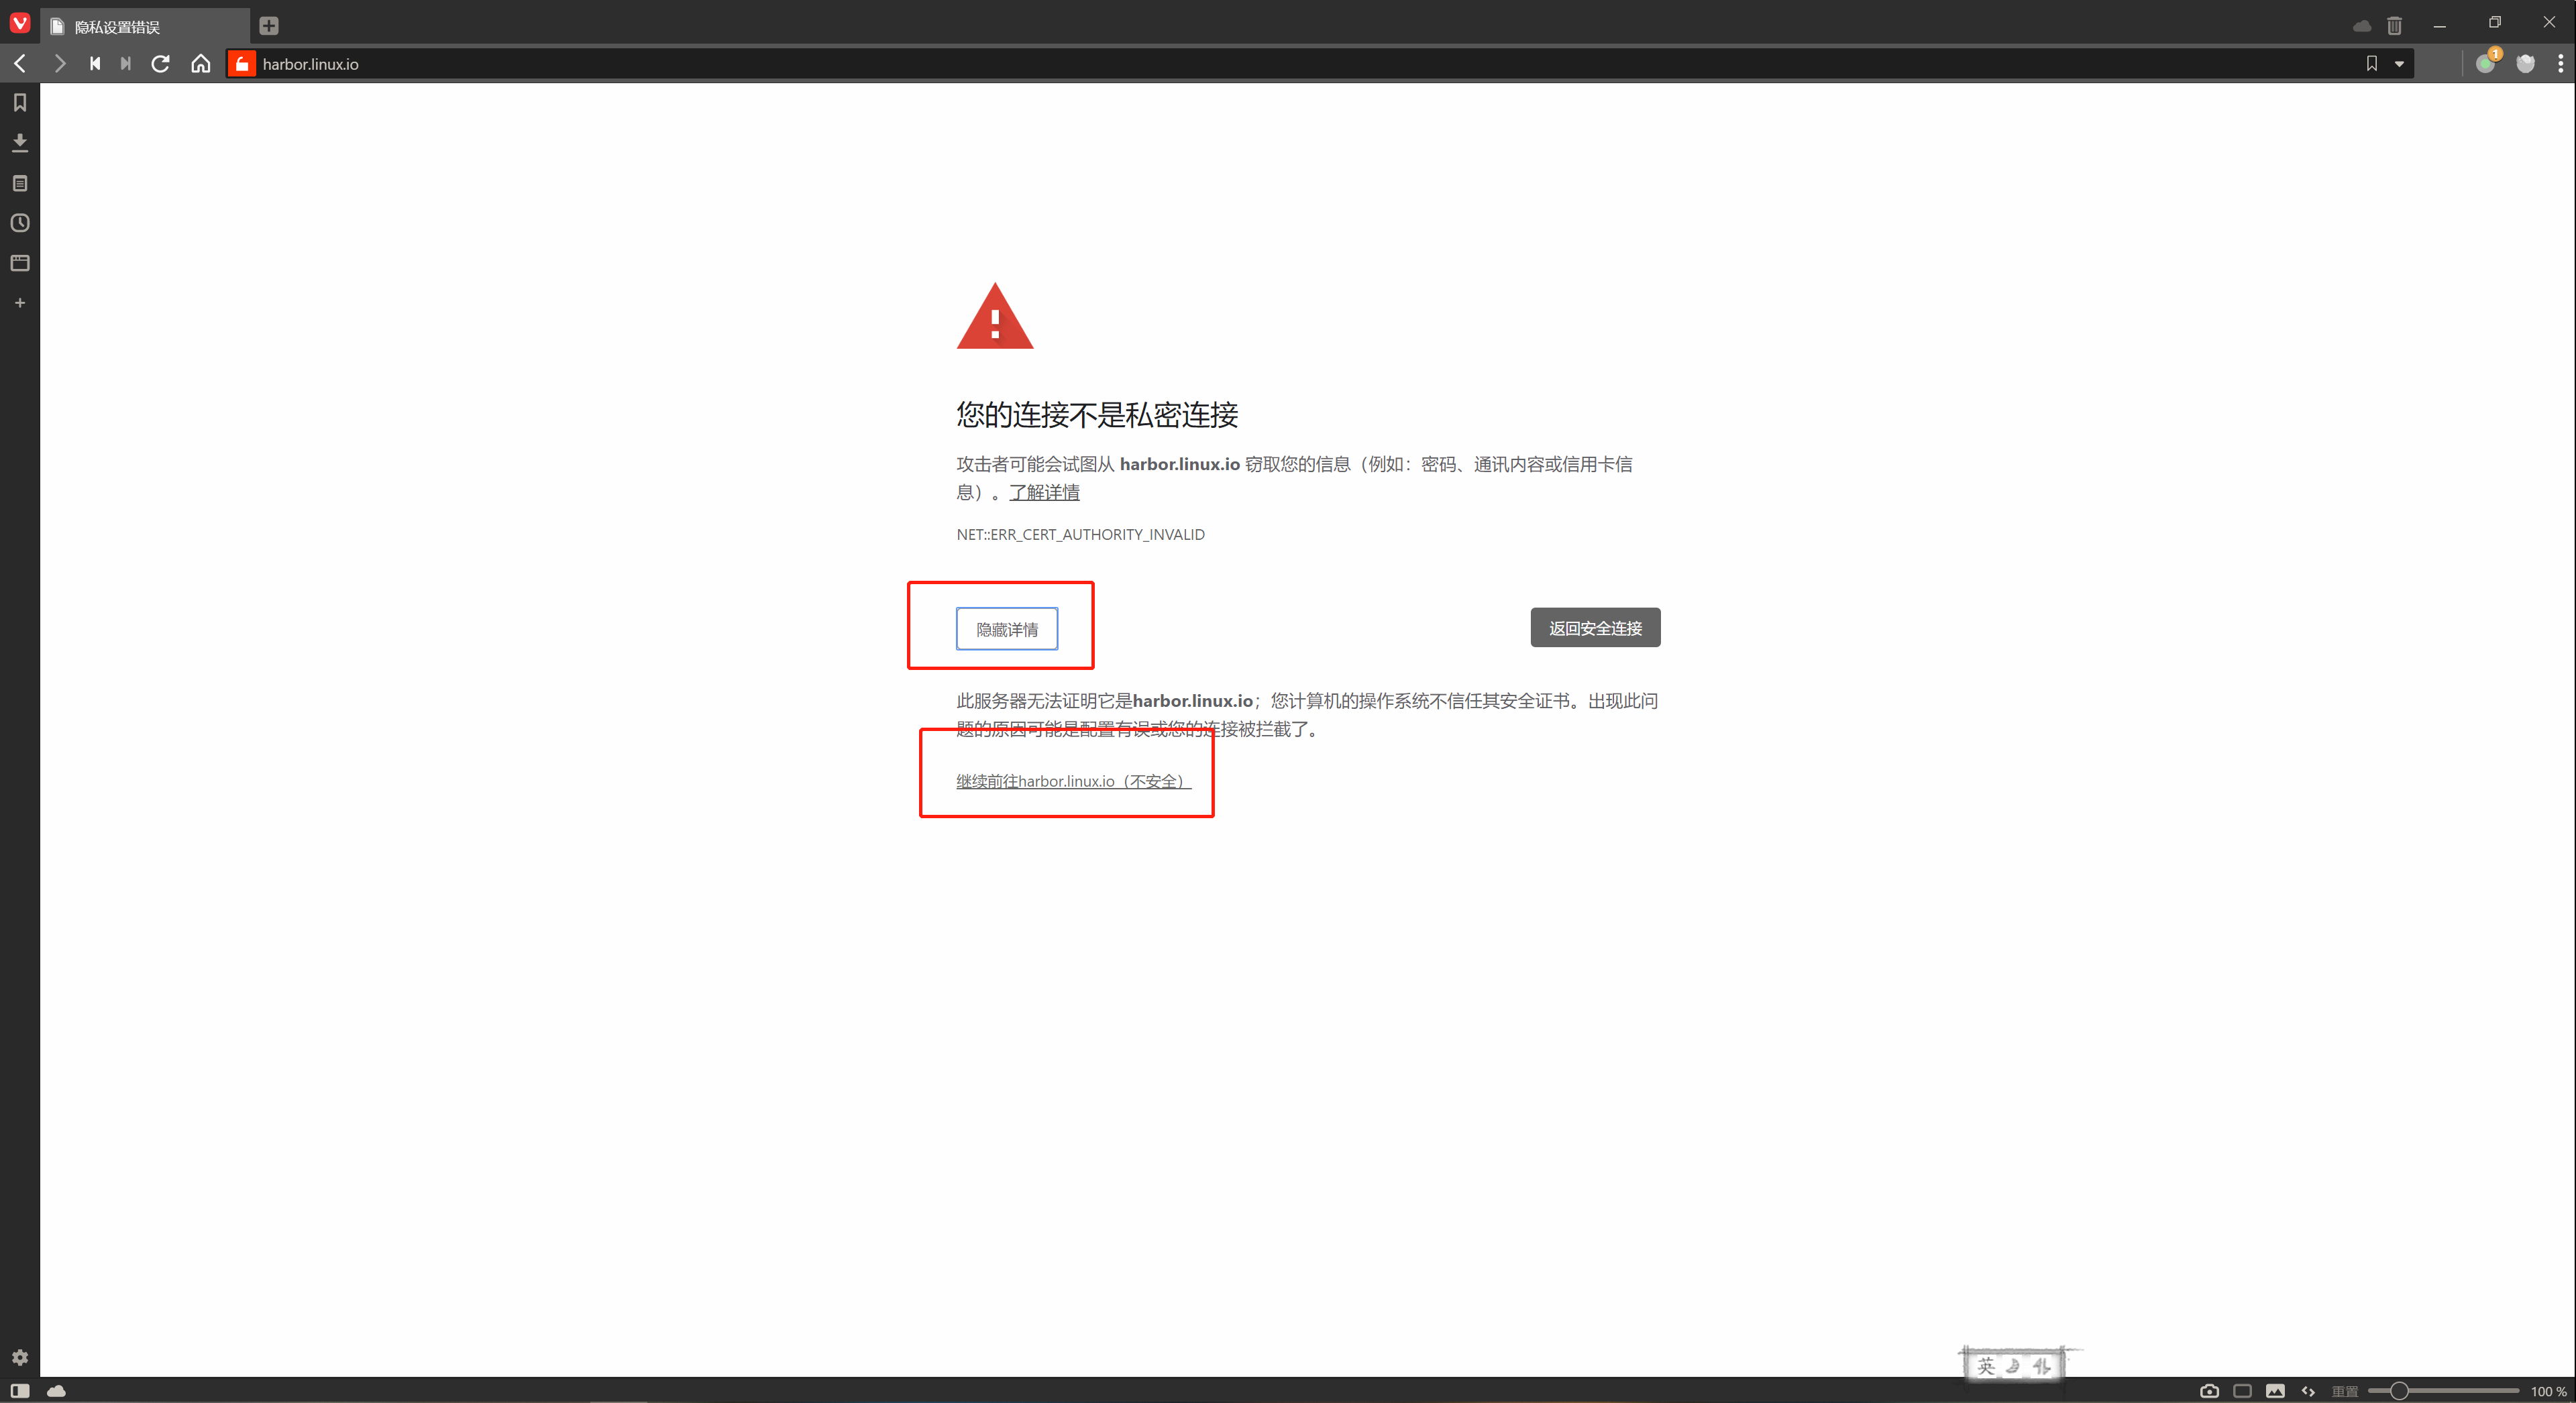
10.2.5.3 在客户端下载CA证书
直接上传镜像会报错
[root@centos8-5 ~]# vim /etc/hosts
10.0.0.200 harbor.linux.io

#没有证书验证,直接登录失败
[root@centos8-5 ~]# docker login harbor.linux.io
Username: admin
Password:
Error response from daemon: Get "https://harbor.linux.io/v2/": x509: certificate relies on legacy Common Name field, use SANs or temporarily enable Common Name matching with GODEBUG=x509ignoreCN=0
在客户端下载ca证书
[root@centos8-5 ~]# mkdir -p /etc/docker/certs.d/harbor.linux.io/
[root@centos8-5 ~]# scp -r harbor.linux.io:/apps/harbor/certs/ca.crt /etc/docker/certs.d/harbor.linux.io/
[root@centos8-5 ~]# scp -r harbor.linux.io:/apps/harbor/certs/harbor.linux.io.cert /etc/docker/certs.d/harbor.linux.io/
[root@centos8-5 ~]# scp -r harbor.linux.io:/apps/harbor/certs/harbor.linux.io.key /etc/docker/certs.d/harbor.linux.io/
[root@centos8-5 ~]# tree /etc/docker/certs.d/harbor.linux.io/
/etc/docker/certs.d/harbor.linux.io/
├── ca.crt
├── harbor.linux.io.cert
└── harbor.linux.io.key

0 directories, 3 files
10.2.5.4 从客户端上传镜像
#先登录系统
[root@centos8-5 ~]# docker login harbor.linux.io
Username: admin
Password:
WARNING! Your password will be stored unencrypted in /root/.docker/config.json.
Configure a credential helper to remove this warning. See
https://docs.docker.com/engine/reference/commandline/login/#credentials-store
Login Succeeded
[root@centos8-5 ~]# docker tag alpine:latest harbor.linux.io/library/alpine:3.14
[root@centos8-5 ~]# docker push harbor.linux.io/library/alpine:3.14
The push refers to repository [harbor.linux.io/library/alpine]
e2eb06d8af82: Pushed
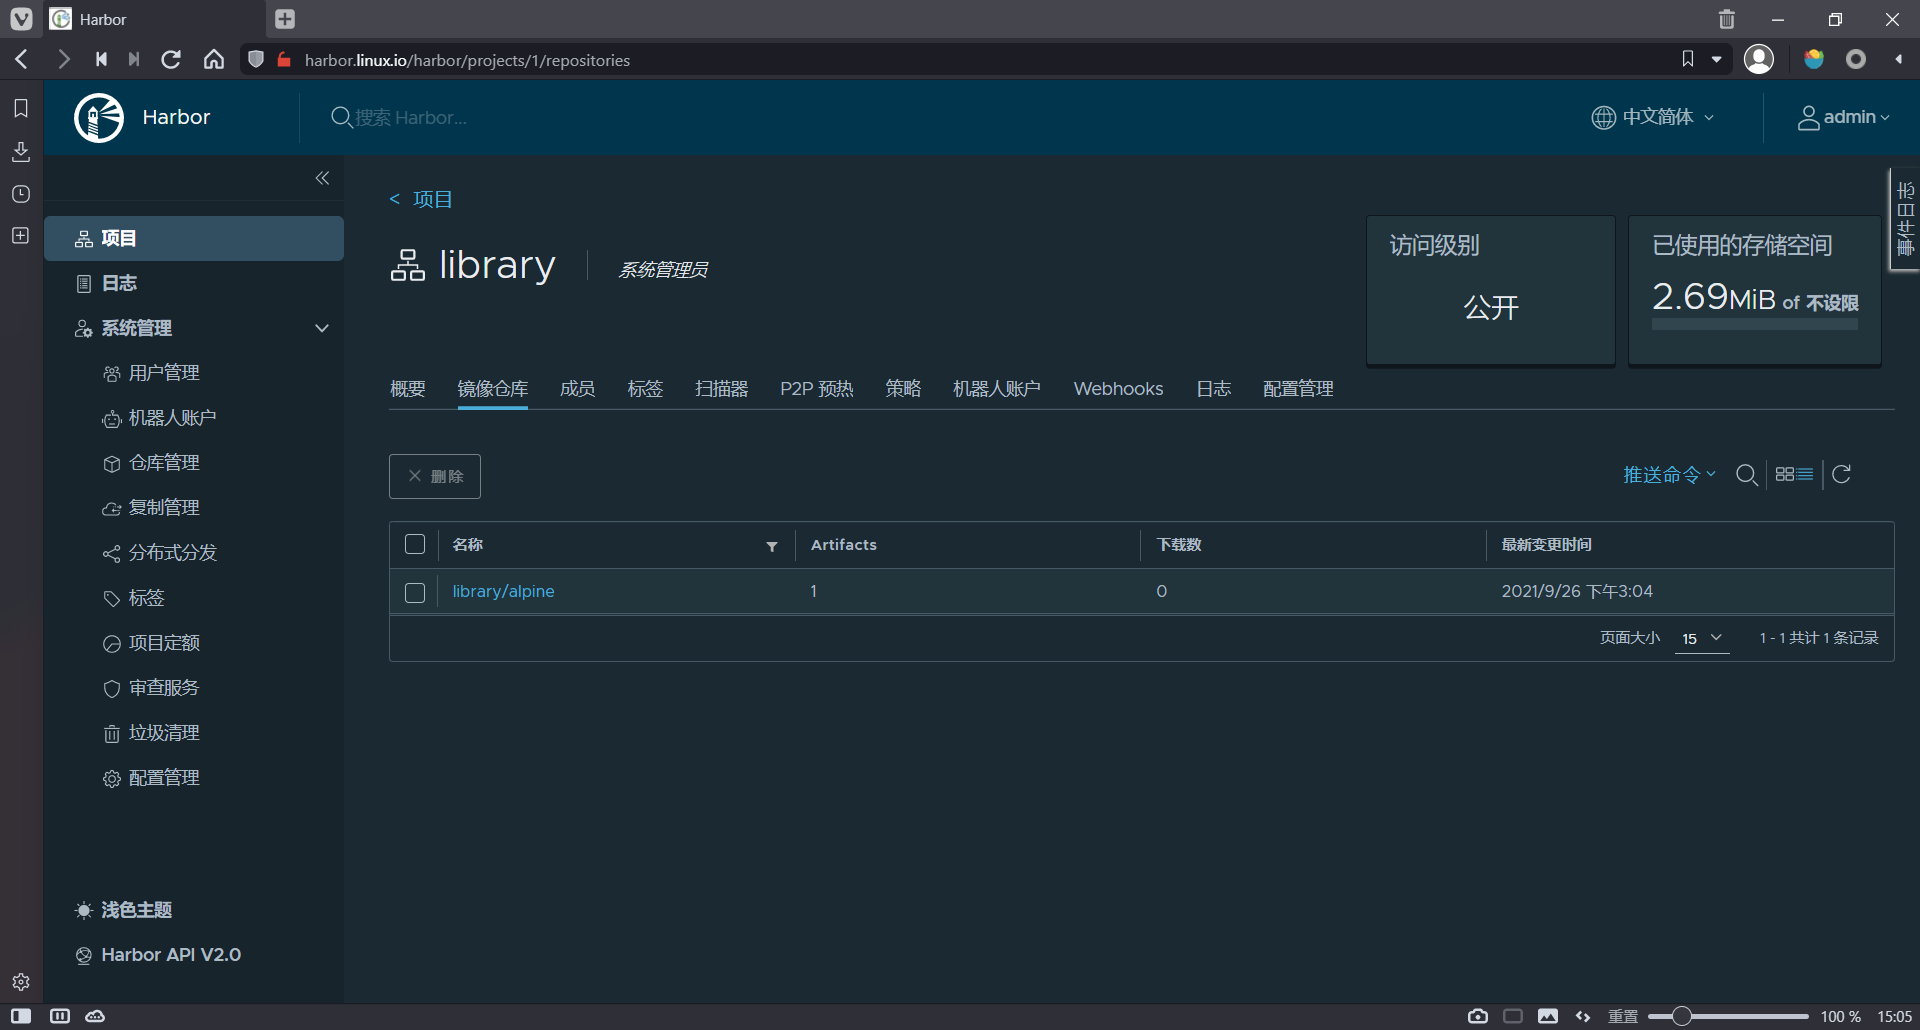
3.14: digest: sha256:69704ef328d05a9f806b6b8502915e6a0a4faa4d72018dc42343f511490daf8a size: 528在harbor上验证上传的镜像
10.2.5.5 从harbor拉取镜像到客户端
[root@centos8-5 ~]# docker images -a
REPOSITORY          TAG                 IMAGE ID            CREATED             SIZE
[root@centos8-5 ~]# docker pull harbor.linux.io/library/alpine:3.14
3.14: Pulling from library/alpine
a0d0a0d46f8b: Pull complete
Digest: sha256:69704ef328d05a9f806b6b8502915e6a0a4faa4d72018dc42343f511490daf8a
Status: Downloaded newer image for harbor.linux.io/library/alpine:3.14
harbor.linux.io/library/alpine:3.14
[root@centos8-5 ~]# docker images -a
REPOSITORY                       TAG                 IMAGE ID            CREATED             SIZE
harbor.linux.io/library/alpine   3.14                14119a10abf4        4 weeks ago         5.6MB