
容器的生命周期
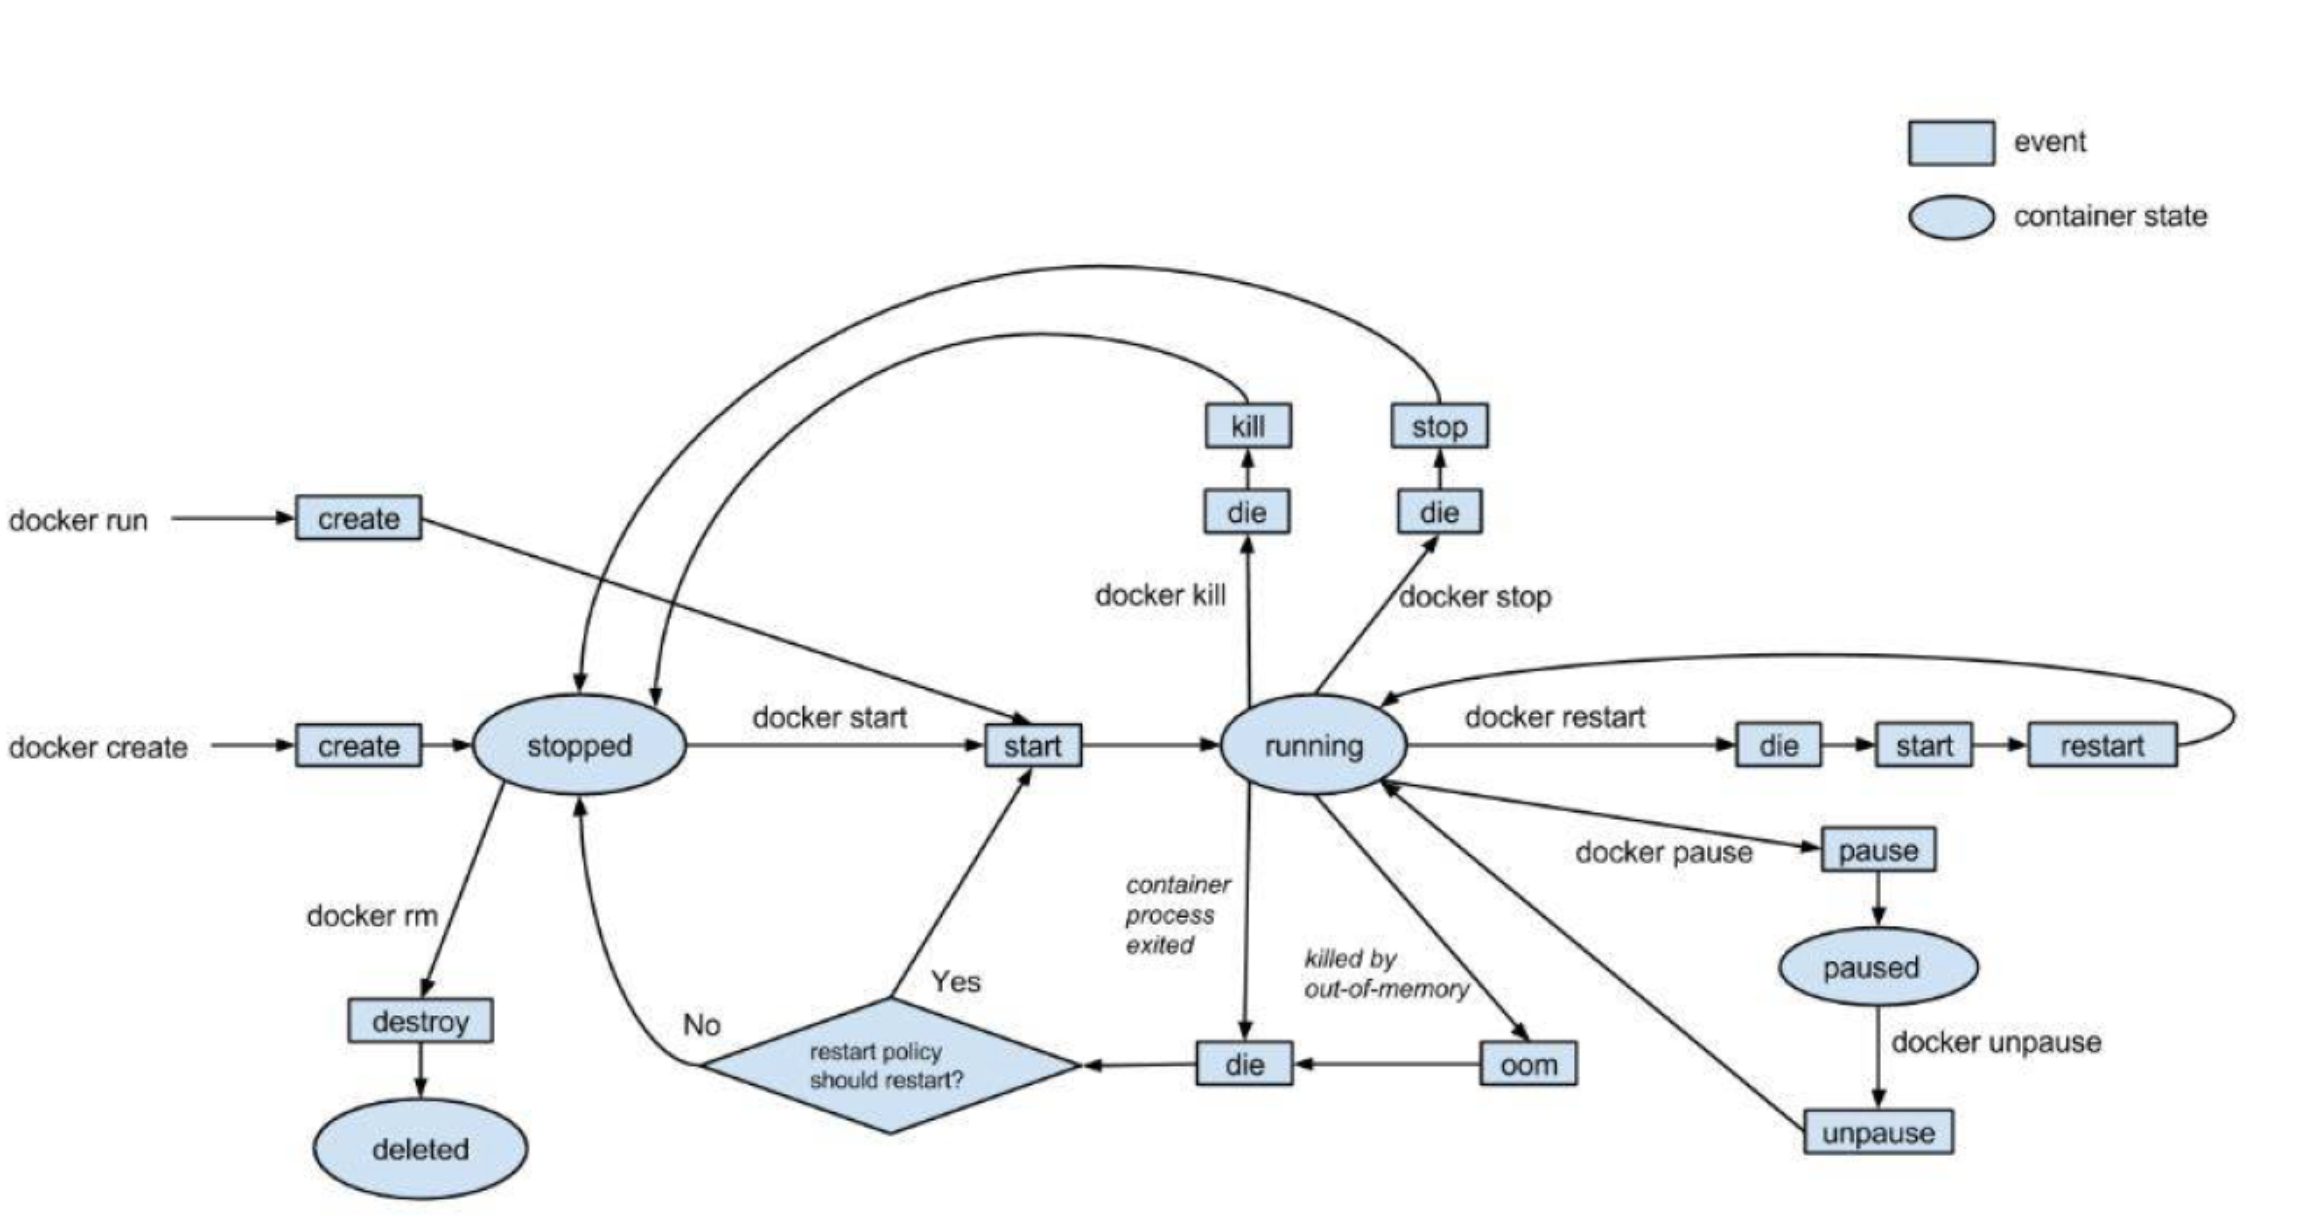
5.1 启动容器
docker run 可以启动容器,进入容器,并随机生成容器ID和名称
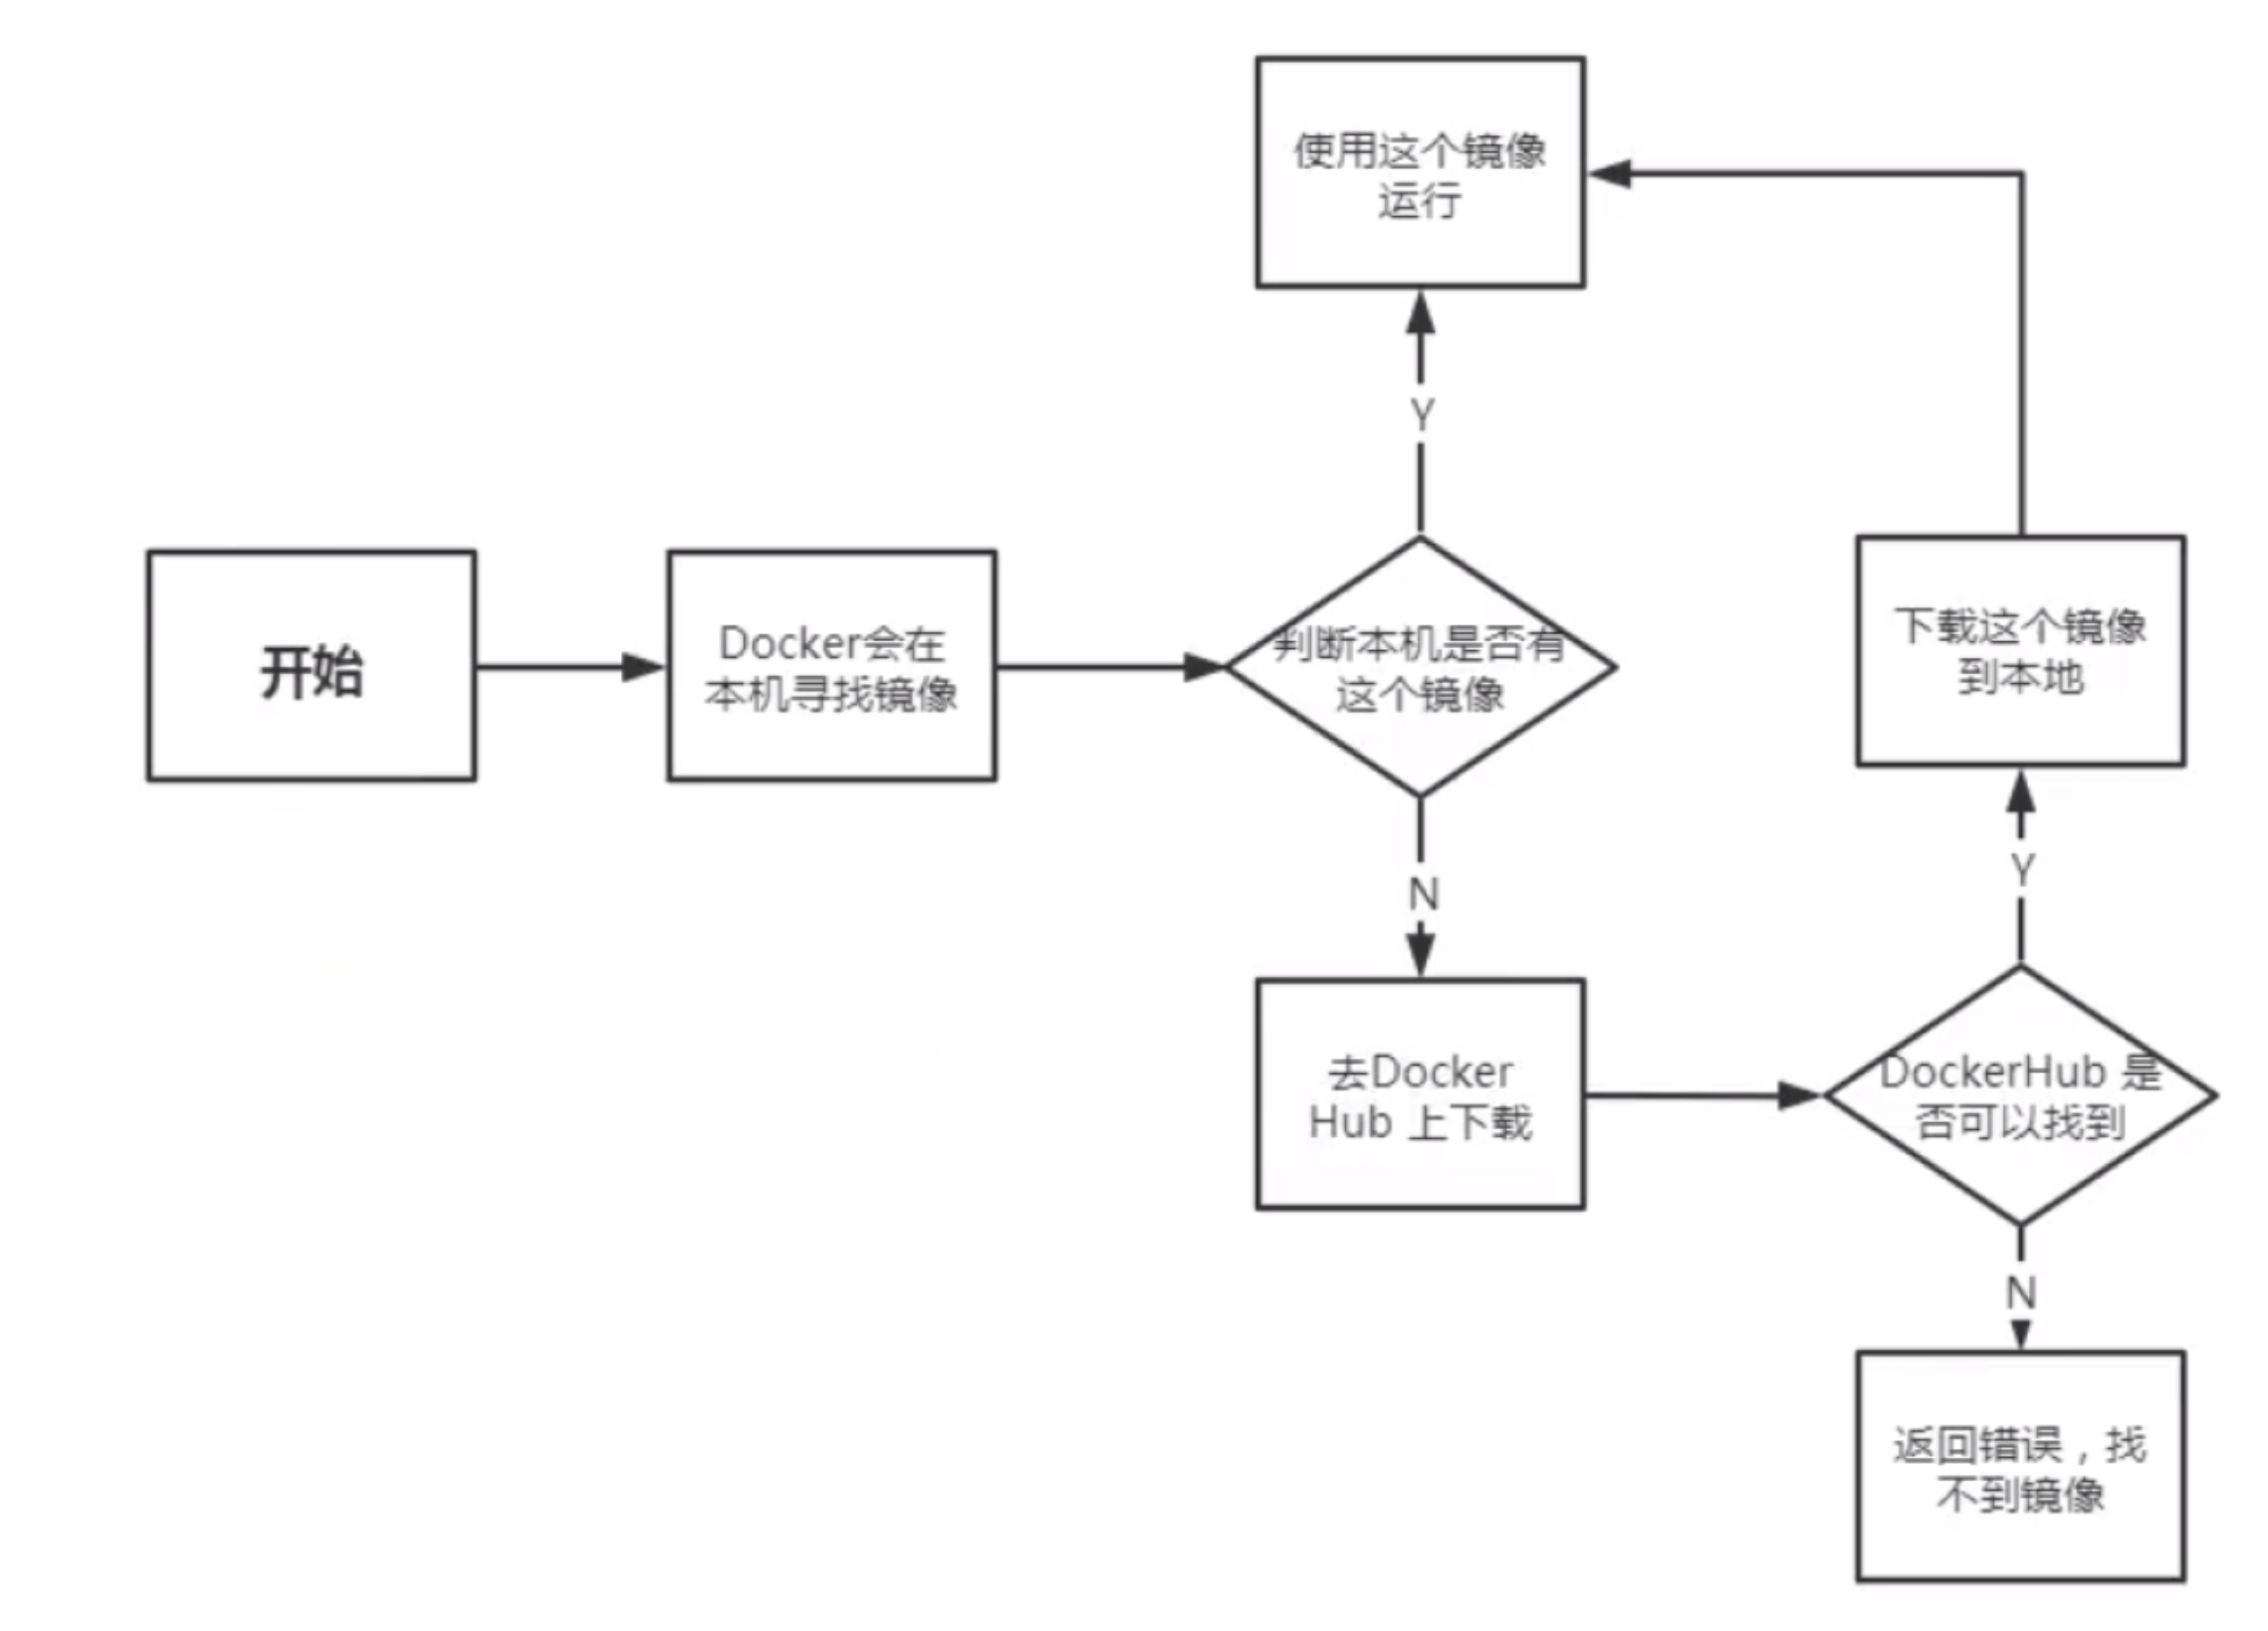
5.1.1 启动第一个容器
如:运行docker的hello-world
root@ubuntu-2010:~# docker run hello-world
Unable to find image 'hello-world:latest' locally
latest: Pulling from library/hello-world
b8dfde127a29: Pull complete
Digest: sha256:61bd3cb6014296e214ff4c6407a5a7e7092dfa8eefdbbec539e133e97f63e09f
Status: Downloaded newer image for hello-world:latest

Hello from Docker!
This message shows that your installation appears to be working correctly.

To generate this message, Docker took the following steps:
 1. The Docker client contacted the Docker daemon.
 2. The Docker daemon pulled the "hello-world" image from the Docker Hub.
    (amd64)
 3. The Docker daemon created a new container from that image which runs the
    executable that produces the output you are currently reading.
 4. The Docker daemon streamed that output to the Docker client, which sent it
    to your terminal.

To try something more ambitious, you can run an Ubuntu container with:
 $ docker run -it ubuntu bash

Share images, automate workflows, and more with a free Docker ID:
 https://hub.docker.com/

For more examples and ideas, visit:
 https://docs.docker.com/get-started/
5.1.2 容器的启动流程
5.1.3 docker run的用法
帮助文档:man docker run
命令行格式:
Usage:  docker run [OPTIONS] IMAGE [COMMAND] [ARG...]

Run a command in a new container

#常用选项
-i, --interactive          Keep STDIN open even if not attached,通常和-t一起使用
-t, --tty                  分配pseudo-TTY,通常和-i一起使用,注意对应的容器必须运行shell才支持进入
-d, --detach               Run container in background and print container ID,台后运行,默认前台
--name string              Assign a name to the container
--rm                       Automatically remove the container when it exits
-p, --publish              list Publish a container's port(s) to the host
-P, --publish-all          Publish all exposed ports to random ports
--dns                      list Set custom DNS servers
--entrypoint string        Overwrite the default ENTRYPOINT of the image
--restart policy
--privileged               Give extended privileges to container
-e, --env=[]               Set environment variables
--env-file=[]              Read in a line delimited file of environment variables
–restart 可以指定四种不同的策略
| policy | 说明 |
| no | Default is no, Do not automatically restart the container when it exits. |
| on-failure[:max-retries] | Restart only if the container exits with a non-zero exit status. Optionally, limit the number of restart retries the Docker daemon attempts. |
| always | Always restart the container regardless of the exit status. When you specify always, the Docker daemon will try to restart the container indefinitely. The container will also always start on daemon startup, regardless of the current state of the container. |
| unless-stopped | Always restart the container regardless of the exit status, but do not start it on daemon startup if the container has been put to a stopped state before. |
注意:容器启动后,如果容器内没有前台运行的进程,将自动退出停止
从容器内退出,并停止容器
exit从容器内退出,且不停止容器
同时按Ctrl+p+q范例:运行一次性容器并执行命令
root@ubuntu-2010:~# docker run alpine echo "Hello world!"
Hello world!
root@ubuntu-2010:~# docker ps -a
CONTAINER ID   IMAGE     COMMAND                 CREATED         STATUS                     PORTS     NAMES
5e2614df35d4   alpine    "echo 'Hello world!'"   6 seconds ago   Exited (0) 6 seconds ago             admiring_wiles
范例:运行一次性容器并执行命令,结束后自动删除容器(常用语测试)
root@ubuntu-2010:~# docker run --rm alpine echo "hello,world!"
hello,world!
root@ubuntu-2010:~# docker ps -a
CONTAINER ID   IMAGE     COMMAND   CREATED   STATUS    PORTS     NAMES
范例:指定容器名称
#注意:每个容器名称只能唯一
root@ubuntu-2010:~# docker run --name alpine1 alpine
root@ubuntu-2010:~# docker ps -a
CONTAINER ID   IMAGE     COMMAND     CREATED         STATUS                     PORTS     NAMES
e50b8a66946d   alpine    "/bin/sh"   6 seconds ago   Exited (0) 5 seconds ago             alpine1
范例:运行容器并交互式终端进入容器
root@ubuntu-2010:~# docker run --rm -ti --name alpine2 alpine
/ # cat /etc/issue
Welcome to Alpine Linux 3.14
Kernel \r on an \m (\l)
范例:后台守护式运行容器,(需要容器有占用前端的命令)
root@ubuntu-2010:~# docker run -d httpd
218d4694e678e66a05cbf88685ff71a0b162a2e9eb67ca1da4dfe6ba6ae18169
root@ubuntu-2010:~# docker ps
CONTAINER ID   IMAGE     COMMAND              CREATED         STATUS         PORTS     NAMES
218d4694e678   httpd     "httpd-foreground"   2 seconds ago   Up 2 seconds   80/tcp    tender_euler
–privileged 选项
大约在0.6版,–privileged 选项被引入docker。使用该参数,container内的root拥有真正的root权限。
否则,container内的root只是外部的一个普通用户权限。privileged启动的容器,可以看到很多host上的设备,并且可以执行mount。甚至允许你在docker容器中启动docker容器。
范例:使用–privileged 选项让容器获取root权限
root@ubuntu-2010:~# docker run -ti centos
[root@01dbf6b7891a /]#
[root@01dbf6b7891a /]#
[root@01dbf6b7891a /]# lsblk
NAME   MAJ:MIN RM   SIZE RO TYPE MOUNTPOINT
loop0    7:0    0  55.4M  1 loop
loop1    7:1    0  55.3M  1 loop
loop2    7:2    0  61.8M  1 loop
loop3    7:3    0  72.5M  1 loop
loop4    7:4    0  32.3M  1 loop
loop5    7:5    0  72.5M  1 loop
loop6    7:6    0    31M  1 loop
sda      8:0    0    50G  0 disk
|-sda1   8:1    0     1M  0 part
|-sda2   8:2    0     1G  0 part
|-sda3   8:3    0    20G  0 part /etc/hosts
|-sda4   8:4    0     4G  0 part [SWAP]
`-sda5   8:5    0    25G  0 part
sr0     11:0    1 997.6M  0 rom
[root@01dbf6b7891a /]# mount /dev/sr0 /mnt
mount: /mnt: permission denied.

#使用--privileged 选项运行容器
root@ubuntu-2010:~# docker run -ti --privileged centos
[root@cabd9c339f00 /]# lsblk
NAME   MAJ:MIN RM   SIZE RO TYPE MOUNTPOINT
loop0    7:0    0  55.4M  1 loop
loop1    7:1    0  55.3M  1 loop
loop2    7:2    0  61.8M  1 loop
loop3    7:3    0  72.5M  1 loop
loop4    7:4    0  32.3M  1 loop
loop5    7:5    0  72.5M  1 loop
loop6    7:6    0    31M  1 loop
sda      8:0    0    50G  0 disk
|-sda1   8:1    0     1M  0 part
|-sda2   8:2    0     1G  0 part
|-sda3   8:3    0    20G  0 part /etc/hosts
|-sda4   8:4    0     4G  0 part [SWAP]
`-sda5   8:5    0    25G  0 part
sr0     11:0    1 997.6M  0 rom
[root@cabd9c339f00 /]# mount /dev/sda5 /mnt
[root@cabd9c339f00 /]# vi /mnt/container.txt
[root@cabd9c339f00 /]# cat /mnt/container.txt
I'm container

#查看宿主机是否生成文件
root@ubuntu-2010:~# cat /data/container.txt
I'm container
范例:运行docker官方文档容器
root@ubuntu-2010:~# docker run -it -d -p 4000:4000 docs/docker.github.io
root@ubuntu-2010:~# docker images
REPOSITORY              TAG       IMAGE ID       CREATED         SIZE
docs/docker.github.io   latest    32ed84d97e30   15 months ago   1GB
#浏览器访问http://ip:4000/可以看到以下的docker文档资料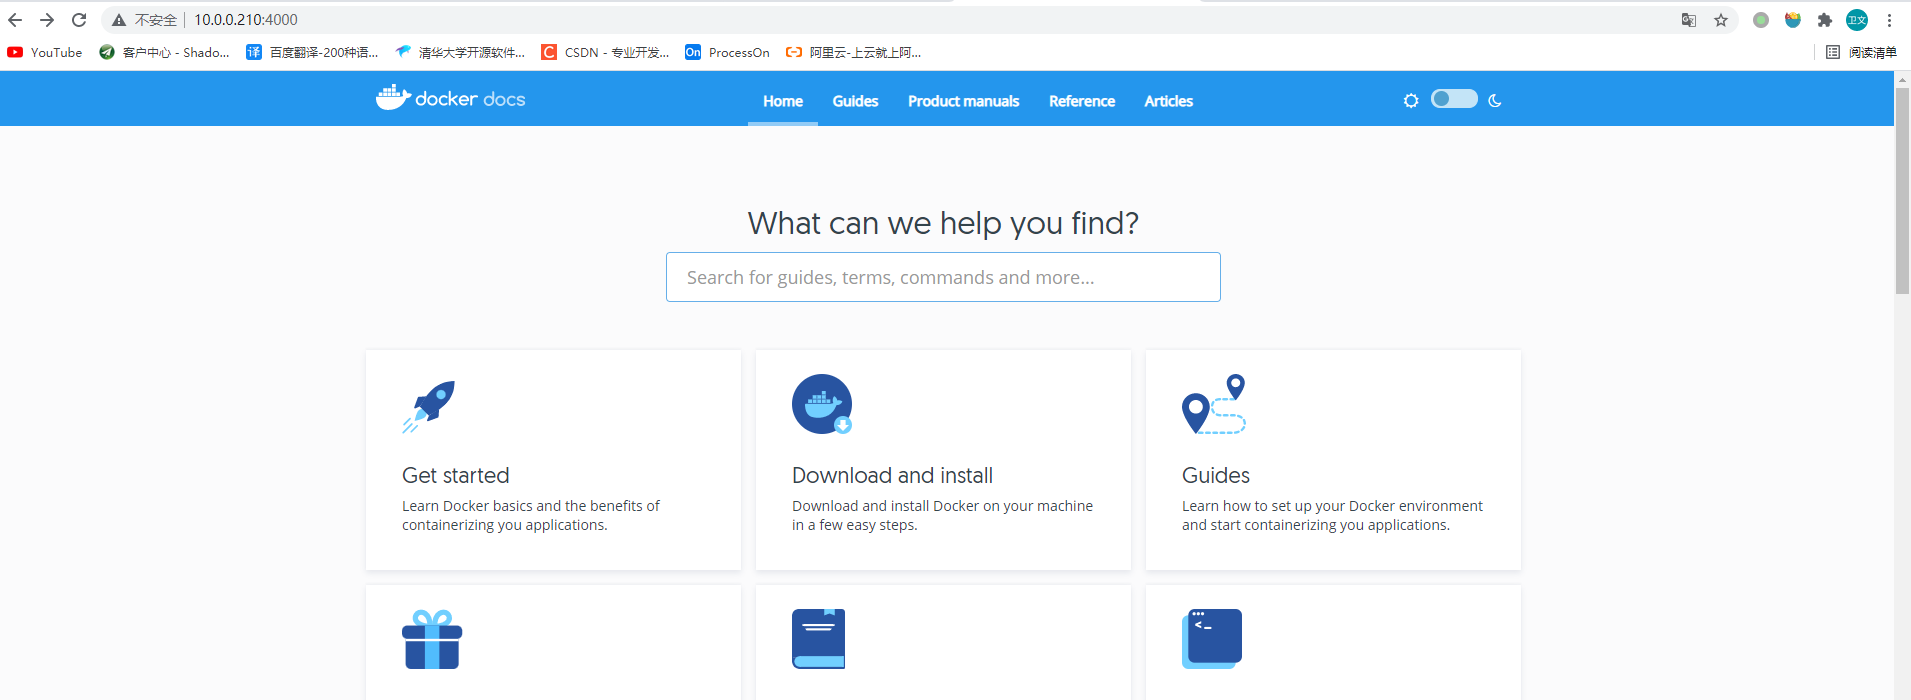
5.2 查看容器信息
5.2.1 查看当前存在的容器 docker ps
格式:
docker ps [OPTIONS]
选项:
-a, --all         Show all containers (default shows just running)
-q, --quiet       Only display numeric IDs
-s, --size        Display total file sizes
-f, --filter      filter Filter output based on conditions provided
#显示运行中的容器
root@ubuntu-2010:~# docker ps
CONTAINER ID IMAGE COMMAND CREATED STATUS PORTS NAMES
b49b0083fd0d docs/docker.github.io "/docker-entrypoint.…" 6 minutes ago Up 6 minutes 80/tcp, 0.0.0.0:4000->4000/tcp, :::4000->4000/tcp keen_lalande
#显示全部容器,包括退出状态的容器
root@ubuntu-2010:~# docker ps -a
CONTAINER ID IMAGE COMMAND CREATED STATUS PORTS NAMES
9ad4c5e283a1 docs/docker.github.io "/docker-entrypoint.…" 6 minutes ago Created brave_liskov
b49b0083fd0d docs/docker.github.io "/docker-entrypoint.…" 6 minutes ago Up 6 minutes 80/tcp, 0.0.0.0:4000->4000/tcp, :::4000>4000/tcp keen_lalande
cabd9c339f00 centos "/bin/bash" 18 minutes ago Exited (0) 9 minutes ago great_driscoll
f10f75a1d99c centos "/bin/bash" 20 minutes ago Exited (0) 19 minutes ago dreamy_gal
#只查看退出的容器
root@ubuntu-2010:~# docker ps -f "status=exited"
CONTAINER ID IMAGE COMMAND CREATED STATUS PORTS NAMES
cabd9c339f00 centos "/bin/bash" 21 minutes ago Exited (0) 12 minutes ago great_driscoll
f10f75a1d99c centos "/bin/bash" 23 minutes ago Exited (0) 22 minutes ago dreamy_galois
01dbf6b7891a centos "/bin/bash" 24 minutes ago Exited (32) 23 minutes ago musing_saha
#只显示容器ID
root@ubuntu-2010:~# docker ps -a -q
9ad4c5e283a1
b49b0083fd0d
cabd9c339f00
f10f75a1d99c
01dbf6b7891a
#显示容器大小
root@ubuntu-2010:~# docker ps -a -s
CONTAINER ID IMAGE COMMAND CREATED STATUS PORTS NAMES SIZE
cabd9c339f00 centos "/bin/bash" 22 minutes ago Exited (0) 13 minutes ago great_driscoll 98B (virtual 231MB)
f10f75a1d99c centos "/bin/bash" 24 minutes ago Exited (0) 23 minutes ago dreamy_galois 47B (virtual 231MB)5.2.2 查看容器的进程 docker top
格式:
docker top CONTAINER [ps OPTIONS]root@ubuntu-2010:~# docker run -d httpd
5706efead73f01fec2b86c56b1b083434263d4a62bd749887809aa201e579ad0
root@ubuntu-2010:~# docker top 570
UID PID PPID C STIME TTY TIME CMD
root 35838 35819 0 05:57 ? 00:00:00 httpd -DFOREGROUND
daemon 35868 35838 0 05:57 ? 00:00:00 httpd -DFOREGROUND
daemon 35869 35838 0 05:57 ? 00:00:00 httpd -DFOREGROUND
daemon 35870 35838 0 05:57 ? 00:00:00 httpd -DFOREGROUND
5.2.3 查看容器资源使用情况 docker stats
格式:
docker stats [OPTIONS] [CONTAINER…]oot@ubuntu-2010:~# docker stats 570
CONTAINER ID NAME CPU % MEM USAGE / LIMIT MEM % NET I/O BLOCK I/O PIDS
5706efead73f suspicious_chandrasekhar 0.00% 8.477MiB / 3.812GiB 0.22% 1.09kB / 0B 262kB / 0B 825.2.4 查看容器详细信息docker inspect
格式:
docker inspect [OPTIONS] NAME|ID [NAME|ID...]
Options:
-f, --format string Format the output using the given Go template
-s, --size Display total file sizes if the type is container
root@ubuntu-2010:~# docker inspect -f "{{.ID}}" httpd
sha256:f34528d8e714f1b877711deafec0d957394a86987cbba54d924bc0a6e517a7ac5.3 删除容器
docker rm 可以删除容器,几时容器正在运行当中,也可以被强制删除掉
格式:
docker rm [OPTIONS] CONTAINER [CONTAINER...]

#选项:
-f, --force          Force the removal of a running container (uses SIGKILL)
-v, --volumes        Remove the volumes associated with the container
强制删除运行中的容器:
root@ubuntu-2010:~# docker ps
CONTAINER ID   IMAGE     COMMAND              CREATED          STATUS          PORTS     NAMES
5706efead73f   httpd     "httpd-foreground"   12 minutes ago   Up 12 minutes   80/tcp    suspicious_chandrasekhar
root@ubuntu-2010:~# docker rm 570
Error response from daemon: You cannot remove a running container 5706efead73f01fec2b86c56b1b083434263d4a62bd749887809aa201e579ad0. Stop the container before attempting removal or force remove
root@ubuntu-2010:~# docker rm -f 570
570
root@ubuntu-2010:~# docker ps -a
CONTAINER ID   IMAGE     COMMAND   CREATED   STATUS    PORTS     NAMES
5.4 容器的启动和停止
格式:
docker start|stop|restart|pause|unpause 容器ID/NAMEroot@ubuntu-2010:~# docker run -d httpd
464529d480c591019492e3b84b9010db400f27da74053c46fa2a002b8db48901
root@ubuntu-2010:~# docker ps -a
CONTAINER ID IMAGE COMMAND CREATED STATUS PORTS NAMES
464529d480c5 httpd "httpd-foreground" 4 seconds ago Up 3 seconds 80/tcp musing_montalcini
#停止一个容器
root@ubuntu-2010:~# docker stop 464
464
root@ubuntu-2010:~# docker ps -a
CONTAINER ID IMAGE COMMAND CREATED STATUS PORTS NAMES
464529d480c5 httpd "httpd-foreground" 18 seconds ago Exited (0) 3 seconds ago musing_montalcini
#运行一个已停止的容器
root@ubuntu-2010:~# docker start 464
464
root@ubuntu-2010:~# docker ps -a
CONTAINER ID IMAGE COMMAND CREATED STATUS PORTS NAMES
464529d480c5 httpd "httpd-foreground" 35 seconds ago Up 6 seconds 80/tcp musing_montalcini
#暂停一个容器
root@ubuntu-2010:~# docker pause 464
464
root@ubuntu-2010:~# docker ps -a
CONTAINER ID IMAGE COMMAND CREATED STATUS PORTS NAMES
464529d480c5 httpd "httpd-foreground" 2 minutes ago Up About a minute (Paused) 80/tcp musing_montalcini
#继续运行一个容器
root@ubuntu-2010:~# docker unpause 464
464
root@ubuntu-2010:~# docker ps -a
CONTAINER ID IMAGE COMMAND CREATED STATUS PORTS NAMES
464529d480c5 httpd "httpd-foreground" 2 minutes ago Up About a minute 80/tcp musing_montalcini5.5 发送信号给正在运行的容器
docker kill 可以给容器发信号
格式:
docker kill [OPTIONS] CONTAINER [CONTAINER...]

#选项:
-s, --signal string Signal to send to the container (default "KILL")
5.6 进入正在运行的容器
5.6.1 使用attach命令
docker attach 容器名,attach 类似于vnc,操作会在同一个容器的多个会话界面同步显示,所有使用此方式进入容器的操作都是同步显示的,且使用exit退出后容器自动关闭,不推荐使用,需要进入到有shell环境的容器
格式:
docker attach [OPTIONS] CONTAINER5.6.2 使用exec命令
在运行中的容器启动新进程,可以执行单次命令,以及进入容器
在测试环境使用此方式,使用exit退出,但容器还在运行,此为推荐方式
格式:
docker exec [OPTIONS] CONTAINER COMMAND [ARG...]
常用选项:
-d, --detach          Detached mode: run command in the background
-e, --env             list Set environment variables
-i, --interactive     Keep STDIN open even if not attached
-t, --tty             Allocate a pseudo-TTY

#常见用法
docker exec -it 容器ID bash|sh
root@ubuntu-2010:~# docker ps -a
CONTAINER ID IMAGE COMMAND CREATED STATUS PORTS NAMES
7717f6ffce4c httpd "httpd-foreground" 4 seconds ago Up 3 seconds 80/tcp busy_edison
root@ubuntu-2010:~# docker exec 771 cat /etc/os-release
PRETTY_NAME="Debian GNU/Linux 10 (buster)"
NAME="Debian GNU/Linux"
VERSION_ID="10"
VERSION="10 (buster)"
VERSION_CODENAME=buster
ID=debian
HOME_URL="https://www.debian.org/"
SUPPORT_URL="https://www.debian.org/support"
BUG_REPORT_URL="https://bugs.debian.org/"
#进入容器并分配伪终端
root@ubuntu-2010:~# docker exec -ti 771 bash
root@7717f6ffce4c:/usr/local/apache2# 5.6 暴露容器端口
5.6.1 暴露所有容器端口
docker run -P 可以将容器事先预定义的所有端口映射到宿主机的随机端口,默认从32768开始
使用随机端口,当停止容器后再启动可能会导致端口发生变化
-P , --publish-all= true | false默认为false
#示例:
docker run -P docker.io/nginx #映射容器所有暴露端口至随机本地端口
docker port 可以查看容器的端口映射关系
格式:
docker port CONTAINER [PRIVATE_PORT[/PROTO]]root@ubuntu-2010:~# docker run -d -P httpd
e053c5ccd3f217a743c06282762531d7237bdf85184a4596baf5ac2112f7feb8
root@ubuntu-2010:~# docker port e
80/tcp -> 0.0.0.0:49153
80/tcp -> :::49153
端口映射的本质就是利用NAT技术实现的
#端口映射前的iptables规则
root@ubuntu-2010:~# iptables -S
-P INPUT ACCEPT
-P FORWARD DROP
-P OUTPUT ACCEPT
-N DOCKER
-N DOCKER-ISOLATION-STAGE-1
-N DOCKER-USER
-N DOCKER-ISOLATION-STAGE-2
-A FORWARD -j DOCKER-USER
-A FORWARD -j DOCKER-ISOLATION-STAGE-1
-A FORWARD -o docker0 -m conntrack --ctstate RELATED,ESTABLISHED -j ACCEPT
-A FORWARD -o docker0 -j DOCKER
-A FORWARD -i docker0 ! -o docker0 -j ACCEPT
-A FORWARD -i docker0 -o docker0 -j ACCEPT
-A DOCKER-ISOLATION-STAGE-1 -i docker0 ! -o docker0 -j DOCKER-ISOLATION-STAGE-2
-A DOCKER-ISOLATION-STAGE-1 -j RETURN
-A DOCKER-USER -j RETURN
-A DOCKER-ISOLATION-STAGE-2 -o docker0 -j DROP
-A DOCKER-ISOLATION-STAGE-2 -j RETURN

root@ubuntu-2010:~# iptables -S -t nat
-P PREROUTING ACCEPT
-P INPUT ACCEPT
-P POSTROUTING ACCEPT
-P OUTPUT ACCEPT
-N DOCKER
-A PREROUTING -m addrtype --dst-type LOCAL -j DOCKER
-A POSTROUTING -s 172.17.0.0/16 ! -o docker0 -j MASQUERADE
-A OUTPUT ! -d 127.0.0.0/8 -m addrtype --dst-type LOCAL -j DOCKER
-A DOCKER -i docker0 -j RETURN

root@ubuntu-2010:~# iptables -S -t nat > pre.nat
root@ubuntu-2010:~# iptables -S  > pre.filter


#实现端口映射
root@ubuntu-2010:~# docker run -d -P --name httpd1 httpd
65fdf1e2cd7a861aee5dc4e161cfdc2927851c36b7bd5f2f99c0a86d7c8f2255
root@ubuntu-2010:~# docker exec httpd1 hostname -i
172.17.0.2
root@ubuntu-2010:~# docker port httpd1
80/tcp -> 0.0.0.0:49154
80/tcp -> :::49154

#端口映射后的iptables规则前后对比
root@ubuntu-2010:~# iptables -S > post.filter
root@ubuntu-2010:~# iptables -S -t nat > post.nat
root@ubuntu-2010:~# diff pre.filter post.filter
13a14
> -A DOCKER -d 172.17.0.2/32 ! -i docker0 -o docker0 -p tcp -m tcp --dport 80 -j ACCEPT
root@ubuntu-2010:~# diff pre.nat post.nat
7a8
> -A POSTROUTING -s 172.17.0.2/32 -d 172.17.0.2/32 -p tcp -m tcp --dport 80 -j MASQUERADE
9a11
> -A DOCKER ! -i docker0 -p tcp -m tcp --dport 49154 -j DNAT --to-destination 172.17.0.2:80

#利用iptables阻止10.0.0.8的访问
[root@centos8-1 ~]# curl 10.0.0.210:49154 -I
HTTP/1.1 200 OK
Date: Fri, 17 Sep 2021 07:39:08 GMT
Server: Apache/2.4.48 (Unix)
Last-Modified: Mon, 11 Jun 2007 18:53:14 GMT
ETag: "2d-432a5e4a73a80"
Accept-Ranges: bytes
Content-Length: 45
Content-Type: text/html

root@ubuntu-2010:~# iptables -I DOCKER -s 10.0.0.8 -d 172.17.0.2 -p tcp --dport 80 -j REJECT
root@ubuntu-2010:~# iptables -S
-P INPUT ACCEPT
-P FORWARD DROP
-P OUTPUT ACCEPT
-N DOCKER
-N DOCKER-ISOLATION-STAGE-1
-N DOCKER-USER
-N DOCKER-ISOLATION-STAGE-2
-A FORWARD -j DOCKER-USER
-A FORWARD -j DOCKER-ISOLATION-STAGE-1
-A FORWARD -o docker0 -m conntrack --ctstate RELATED,ESTABLISHED -j ACCEPT
-A FORWARD -o docker0 -j DOCKER
-A FORWARD -i docker0 ! -o docker0 -j ACCEPT
-A FORWARD -i docker0 -o docker0 -j ACCEPT
-A DOCKER -s 10.0.0.8/32 -d 172.17.0.2/32 -p tcp -m tcp --dport 80 -j REJECT --reject-with icmp-port-unreachable
-A DOCKER -d 172.17.0.2/32 ! -i docker0 -o docker0 -p tcp -m tcp --dport 80 -j ACCEPT
-A DOCKER-ISOLATION-STAGE-1 -i docker0 ! -o docker0 -j DOCKER-ISOLATION-STAGE-2
-A DOCKER-ISOLATION-STAGE-1 -j RETURN
-A DOCKER-USER -j RETURN
-A DOCKER-ISOLATION-STAGE-2 -o docker0 -j DROP
-A DOCKER-ISOLATION-STAGE-2 -j RETURN


#访问测试
[root@centos8-1 ~]# curl 10.0.0.210:49154 -I
curl: (7) Failed to connect to 10.0.0.210 port 49154: Connection refused

root@ubuntu-2010:~# curl localhost:49154 -I
HTTP/1.1 200 OK
Date: Fri, 17 Sep 2021 07:41:37 GMT
Server: Apache/2.4.48 (Unix)
Last-Modified: Mon, 11 Jun 2007 18:53:14 GMT
ETag: "2d-432a5e4a73a80"
Accept-Ranges: bytes
Content-Length: 45
Content-Type: text/html
5.6.2 指定端口映射
docker run -p 可以将容器的预定义的指定端口映射到宿主机的相应端口
注意: 多个容器映射到宿主机的端口不能冲突,但容器内使用的端口可以相同
方式1: 容器80端口映射本地随机端口
docker run -p 80 --name test-port1 httpd方式2:容器80端口映射到本地指定端口,如:81
docker run -p 81:80 --name test-port2 httpd方式3:本地IP:本地端口:容器端口,如:82
docker run -p ip:82:80 --name test-port3 httpd方式4:本地IP:本地随机端口:容器端口,默认从32768开始
docker run -p ip::80 --name test-port4 httpd方式5:本地ip:本地端口:容器端口/协议,默认为tcp协议
docker run -p ip:83:80/udp --name test-port5 httpd方式6:一次性映射多个端口+协议
docker run -p 8080:80/tcp -p 8443:443/tcp -p 53:53/udp --name test-port6 httpd范例:
root@ubuntu-2010:~# docker run -d  -p 8080:80/tcp -p 8443:443/tcp -p 8053:53/udp --name test-port6 httpd
c0cbdeaf8c0c4b2d03ac6e45987aa692f2bb3e54e87bd3bc2bea72e8d6b201dc
root@ubuntu-2010:~# docker ps
CONTAINER ID   IMAGE     COMMAND              CREATED         STATUS         PORTS                                                                                                                   NAMES
c0cbdeaf8c0c   httpd     "httpd-foreground"   3 seconds ago   Up 2 seconds   0.0.0.0:8053->53/udp, :::8053->53/udp, 0.0.0.0:8080->80/tcp, :::8080->80/tcp, 0.0.0.0:8443->443/tcp, :::8443->443/tcp   test-port6
实战案例: 修改已经创建的容器的端口映射关系
root@ubuntu-2010:~# docker run -d -p 80:80 --name httpd1 httpd
696b25d9c3ad7fbc4f30b8addefede7284962d5f5beeb4eca32650ac0e76bb46
root@ubuntu-2010:~# docker port httpd1
80/tcp -> 0.0.0.0:80
80/tcp -> :::80
root@ubuntu-2010:~# lsof -i:80
COMMAND     PID USER   FD   TYPE DEVICE SIZE/OFF NODE NAME
docker-pr 42670 root    4u  IPv4 167681      0t0  TCP *:http (LISTEN)
docker-pr 42676 root    4u  IPv6 167688      0t0  TCP *:http (LISTEN)
root@ubuntu-2010:~# ls /var/lib/docker/containers/696b25d9c3ad7fbc4f30b8addefede7284962d5f5beeb4eca32650ac0e76bb46/
696b25d9c3ad7fbc4f30b8addefede7284962d5f5beeb4eca32650ac0e76bb46-json.log  config.v2.json   hostname  mounts       resolv.conf.hash
checkpoints                                                                hostconfig.json  hosts     resolv.conf
root@ubuntu-2010:~# systemctl stop docker
root@ubuntu-2010:~# vim /var/lib/docker/containers/696b25d9c3ad7fbc4f30b8addefede7284962d5f5beeb4eca32650ac0e76bb46/hostconfig.json
"PortBindings":{"80/tcp":[{"HostIp":"","HostPort":"80"}]}
#PortBindings后80/tcp对应的是容器内部的80端口,HostPort对应的是映射到宿主机的端口80 修改此
处为82
"PortBindings":{"80/tcp":[{"HostIp":"","HostPort":"82"}]}
root@ubuntu-2010:~# systemctl start docker
root@ubuntu-2010:~# docker start httpd1

root@ubuntu-2010:~# docker port httpd1
80/tcp -> 0.0.0.0:82
80/tcp -> :::82
5.7 查看容器的日志
docker logs 可以查看容器在控制台输出的日志信息
格式:
docker logs [OPTIONS] CONTAINER

选项:
--details                              Show extra details provided to logs
-f, --follow                           Follow log output
--since string                         Show logs since timestamp (e.g. 2013-01-02T13:23:37) or
 relative (e.g. 42m for 42 minutes)
--tail string                          Number of lines to show from the end of the logs (default
 "all")
-t, --timestamps                       Show timestamps
--until string                         Show logs before a timestamp (e.g. 2013-01-02T13:23:37) or
 relative (e.g. 42m for 42 minutes)
root@ubuntu-2010:~# docker run -d alpine /bin/sh -c 'i=1;while true;do echo $i;let i++;sleep 3;done'
c50131b98a0589e076e1d8ae7ff55a4a52a82ea46aa585f1775bd37ba847d062
root@ubuntu-2010:~# docker logs c50
1
2
3
4
root@ubuntu-2010:~# docker logs --tail 3 c50
24
25
26
#显示时间
root@ubuntu-2010:~# docker logs --tail 3 -t c50
2021-09-17T08:15:06.792008196Z 41
2021-09-17T08:15:09.792715374Z 42
2021-09-17T08:15:12.796439675Z 43
#持续跟踪
root@ubuntu-2010:~# docker logs -f c505.8 传递运行命令
容器需要一个前台运行的进程才能保持容器的运行,通过传递运行参数是一种方式,另外也可以在构建镜像的时候指定容器启动时运行的前台命令
容器里的PID为1的守护进程实现方式
- 服务类:如:Nginx,Tomcat,Apache,但服务不能停
- 命令类:如:tail -f /etc/hosts,主要用于测试环境,注意:不要tail -f 访问服务日志,会产生不必要的磁盘IO
root@ubuntu-2010:~# docker run -d --name alpine1 alpine
dd2e628e9af2e0e587269629aabf56322a707f20205bddcc6c58afa9499226ef
root@ubuntu-2010:~# docker run -d -ti --name alpine2 alpine tail -f /etc/hosts
2996b3fee9dbf8a81e9857295aed4ae048c25368f511d3b0f01b2028fa55b529
root@ubuntu-2010:~# docker ps -a
CONTAINER ID   IMAGE     COMMAND                CREATED          STATUS                      PORTS     NAMES
2996b3fee9db   alpine    "tail -f /etc/hosts"   2 seconds ago    Up 2 seconds                          alpine2
dd2e628e9af2   alpine    "/bin/sh"              18 seconds ago   Exited (0) 18 seconds ago             alpine1
5.9 修改容器内部的hosts文件
容器会自动将容器的ID加入自己的/etc/hosts文件中,并解析成容器的IP
root@ubuntu-2010:~# docker ps -a
CONTAINER ID   IMAGE     COMMAND                CREATED          STATUS                      PORTS     NAMES
2996b3fee9db   alpine    "tail -f /etc/hosts"   2 seconds ago    Up 2 seconds                          alpine2
dd2e628e9af2   alpine    "/bin/sh"              18 seconds ago   Exited (0) 18 seconds ago             alpine1
root@ubuntu-2010:~# docker exec -ti 299 /bin/sh
/ # vi /etc/hosts

127.0.0.1       localhost
::1     localhost ip6-localhost ip6-loopback
fe00::0 ip6-localnet
ff00::0 ip6-mcastprefix
ff02::1 ip6-allnodes
ff02::2 ip6-allrouters
172.17.0.2      2996b3fee9db
修改容器的hosts文件
root@ubuntu-2010:~# docker run -ti --rm --add-host test.example.com:8.8.8.8 alpine cat /etc/hosts
127.0.0.1	localhost
::1	localhost ip6-localhost ip6-loopback
fe00::0	ip6-localnet
ff00::0	ip6-mcastprefix
ff02::1	ip6-allnodes
ff02::2	ip6-allrouters
8.8.8.8	test.example.com
172.17.0.3	d01a7f5c44d2
5.10 指定容器DNS
容器的dns服务器,默认采用宿主机的dns地址,可以用下面的方式指定DNS地址
- 将DNS地址配置在宿主机
- 在容器启动时加选项
--dns=x.x.x.x - 在/etc/docker/daemon.json文件中指定
范例:daemon.json指定DNS
root@ubuntu-2010:~# vim /etc/docker/daemon.json
{
  "storage-driver": "overlay2",
  "registry-mirrors":["https://hub-mirror.c.163.com"],
  "dns": ["8.8.8.8"],
  "dns-search": [ "test.com","test.org" ]
}
root@ubuntu-2010:~# systemctl daemon-reload
root@ubuntu-2010:~# systemctl restart docker
root@ubuntu-2010:~# docker run -it --rm alpine cat /etc/resolv.conf
search test.com test.org
nameserver 8.8.8.8

#使用--dns指定优先级更高
root@ubuntu-2010:~# docker run -ti --rm --dns 1.1.1.1 --dns-search a.com alpine cat /etc/resolv.conf
search a.com
nameserver 1.1.1.1
5.11 容器与宿主机之间的文件复制
docker cp [OPTIONS] CONTAINER:SRC_PATH DEST_PATH|-
docker cp [OPTIONS] SRC_PATH|- CONTAINER:DEST_PATH
Options:
-a, --archive Archive mode (copy all uid/gid information)
-L, --follow-link Always follow symbol link in SRC_PATH
root@ubuntu-2010:~# docker run -d httpd
e1d6b99cf1bdd9fc2e542c99a9fd4dcc34832ba1937805d6b850303b09dae708
root@ubuntu-2010:~# docker ps -a
CONTAINER ID IMAGE COMMAND CREATED STATUS PORTS NAMES
e1d6b99cf1bd httpd "httpd-foreground" 4 seconds ago Up 4 seconds 80/tcp vigilant_moser
#将容器内的文件复制到宿主机
root@ubuntu-2010:~# docker cp e1d:/etc/os-release .
invalid symlink "/root/os-release" -> "../usr/lib/os-release"
root@ubuntu-2010:~# docker cp -L e1d:/etc/os-release .
root@ubuntu-2010:~# cat os-release
PRETTY_NAME="Debian GNU/Linux 10 (buster)"
NAME="Debian GNU/Linux"
VERSION_ID="10"
VERSION="10 (buster)"
VERSION_CODENAME=buster
ID=debian
HOME_URL="https://www.debian.org/"
SUPPORT_URL="https://www.debian.org/support"
BUG_REPORT_URL="https://bugs.debian.org/"
#将宿主机文件复制到容器内
root@ubuntu-2010:~# docker cp /etc/issue e1d:/root/
root@ubuntu-2010:~# docker exec e1d cat /root/issue
Ubuntu 20.10 \n \l5.12 传递环境变量
有些容器运行时,需要传递变量,可以使用-e或–env-file实现
范例:传递变量创建Mysql
变量参考链接: https://hub.docker.com/_/mysql
root@ubuntu-2010:~# docker run -d mysql
e06fe3397df1e4c0a342008584268c39518bb436a39b61df9395fce89e504f81
root@ubuntu-2010:~# docker ps -a
CONTAINER ID   IMAGE     COMMAND                  CREATED          STATUS                      PORTS     NAMES
e06fe3397df1   mysql     "docker-entrypoint.s…"   15 seconds ago   Exited (1) 14 seconds ago             nice_ganguly
root@ubuntu-2010:~# docker run -d -e MYSQL_ROOT_PASSWORD=123456 -e MYSQL_DATABASE=test -e MYSQL_USER=test -e MYSQL_PASSWORD=123456 -p 3306:3306 mysql
e5aa619c8d714c35ed060d4b7e389acb3be93f10e357c66462d015928d0fa289
root@ubuntu-2010:~# docker ps -a
CONTAINER ID   IMAGE     COMMAND                  CREATED         STATUS                     PORTS                                                  NAMES
e5aa619c8d71   mysql     "docker-entrypoint.s…"   3 seconds ago   Up 2 seconds               0.0.0.0:3306->3306/tcp, :::3306->3306/tcp, 33060/tcp   practical_jemison
e06fe3397df1   mysql     "docker-entrypoint.s…"   4 minutes ago   Exited (1) 4 minutes ago                                                          nice_ganguly